
How to use HTTP Load Balancer with Cloud Armor?
How to use HTTP Load Balancer with Cloud Armor?
Introduction to Google Cloud Load Balancer
The Google Cloud Load Balancer is defined as a globally distributed load balancing service. It helps the GCP users to distribute applications across the world and scale there’s computer up and down with autoscaling. Apart from this, load balancers allow millions requests per second with no pre-warming.
HTTP Load Balancer
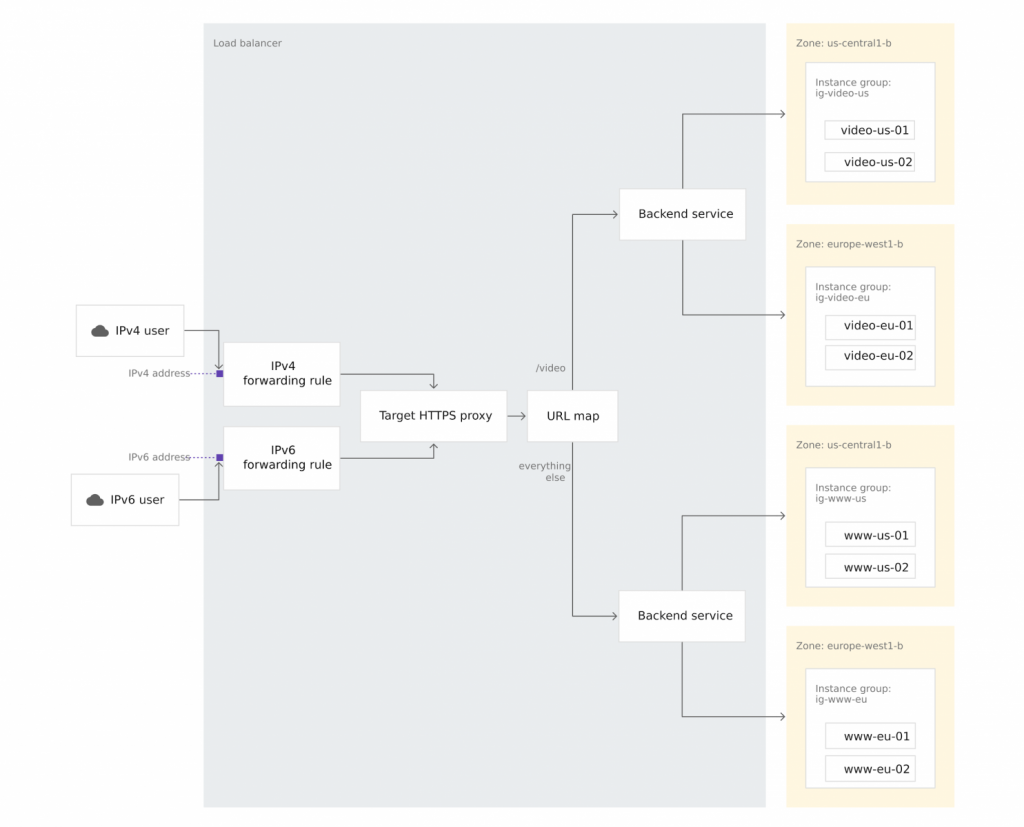
- A HTTP load balancer is one type of the load balancer which contains forwarding rules that directs the incoming requests of a target HTTP proxy.
- The target HTTP proxy will check each request to determine the appropriate backend service for the request.
- Now backend service directs each request to an appropriate backend based on the zone, serving capacity, and instance health of its attached backends.
Health check is another important aspect of the load balancer which checks the health of each backend instance is verified by using an HTTP health check, an HTTPS health check, or an HTTP/2 health check.
Cloud Armor
Cloud Armor is a cloud security service which is supported with Global HTTP(S) Load Balancer to provide built-in defenses against web attackers. Cloud Armor IP blacklists/whitelists helps to restrict or allow access to the HTTP(S) load balancer at the edge of the Google Cloud. It prevents malicious users or traffic from consuming resources or entering into the virtual private cloud (VPC) networks. And also, cloud Armor security policies create logs that can be explored to determine when traffic is denied and when it is allowed, along with the source of the traffic.
Configuring Google Cloud Armor security policies for HTTP Load Balancing
The steps need to configuring Cloud Armor security policies is to enable rules that allow or deny traffic to HTTP(S) Load Balancing:
- Google Cloud Armor security policies must be created.
- Need to add rules to the policy based on IP lists, pre-configured or custom expressions expression sets.
- Attach the Google Cloud Armor security policy to a backend service of the HTTP(S) load balancer for which we want to control access.
- Then update the Google Cloud Armor security policy as needed.
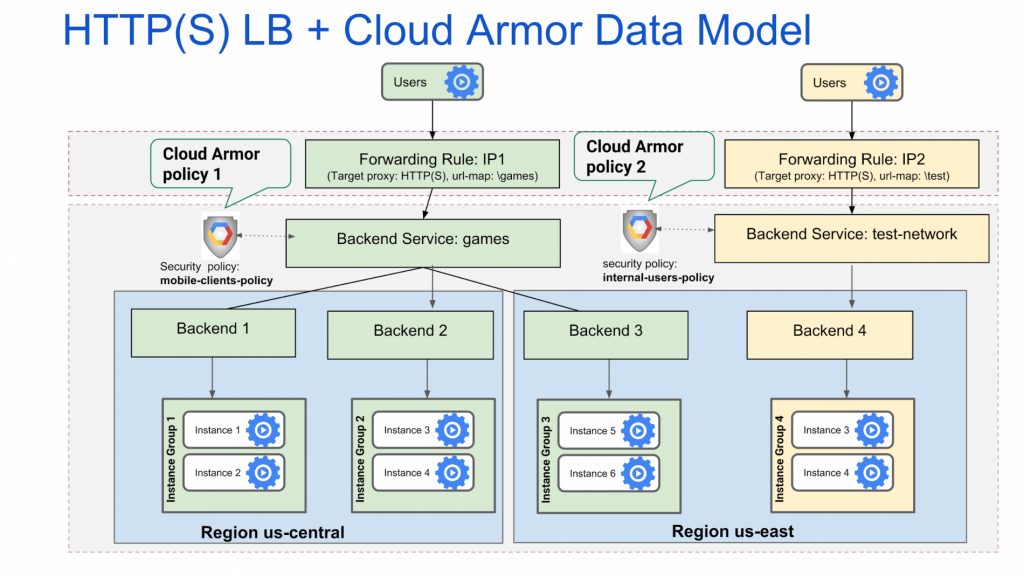
Example process where it contains cloud armour security policy attached to the different Backed Services.
In example process we have two Cloud Armor security policies:
“mobile-clients-policy” which applies to external users of your games services
“internal-users-policy” which applies to the organization’s test-network team
mobile-clients-policy is applied to the games backend service which is for game services, and internal-users-policy is applied to the test-network backend service which is designed for internal test service of the testing team backend service
The Google Cloud Armor security policy associated with the service is applicable to instances in all regions, If the backend instances for a backend service are in multiple regions .As per the above example, the Google Cloud Armor security policy mobile-clients-policy is applicable to instances 1, 2, 3, and 4 in us-central and to instances 5 and 6 in us-east.
Implementing the HTTP Load Balancer with Cloud Armor in Google cloud
Firstly, configure the HTTP Load balancer for the managed instance group then need to be used to create a new VM named as siege to simulate a load on the HTTP Load Balancer.
Step 1: Configure HTTP and health check firewall rules
- Setup firewall rules to allow HTTP and TCP traffic to the backends. For creating the firewall rules we can use both the console and cloud shell. Let’s create two firewall rules on cloudshell one is default-allow-http and the other is default-allow-health-check.

Note: Health check decides which instances of a Load Balancer may receive new connections. The health check probes to your load balancing instances come from addresses in ranges 130.211.0.0/22 and 35.191.0.0/16 for the HTTP load balancing. The rules governing your firewall must allow these connections.
Step 2: Configure instance templates and create instance groups
- An instance template is an API resource that you use to create managed instance groups. Instance templates define the boot disk image, machine type, subnet, labels, and other properties of instance.Build one instance template for us-east1 and one for europe-west1.
- A managed instance group uses an instance template to create a group of similar instances. Use these for building the HTTP Load Balancer backends.

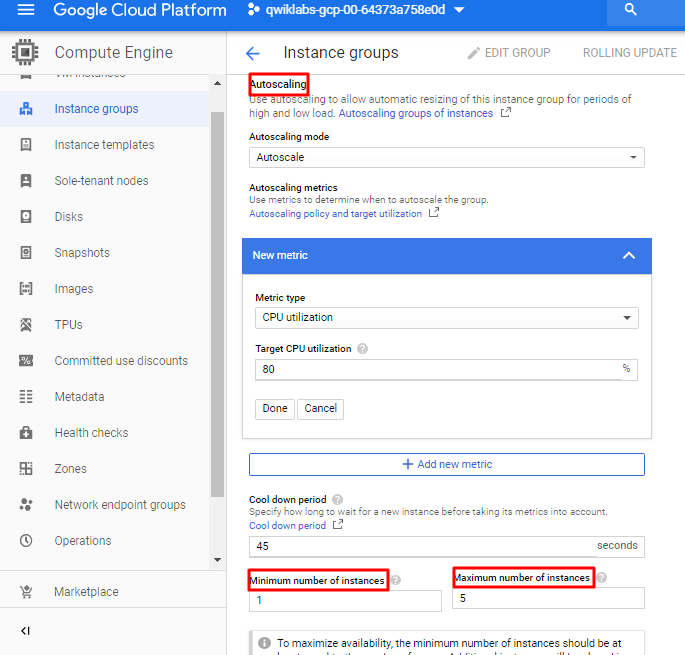
Note: Managed instance groups offer auto scaling capabilities that allow you to automatically add or remove instances from a managed instance group based on load increases or decreases. We just need to define the autoscaling policy and the autoscaler performs automatic scaling based on the measured load.
Step 3: Configure the HTTP Load Balancer
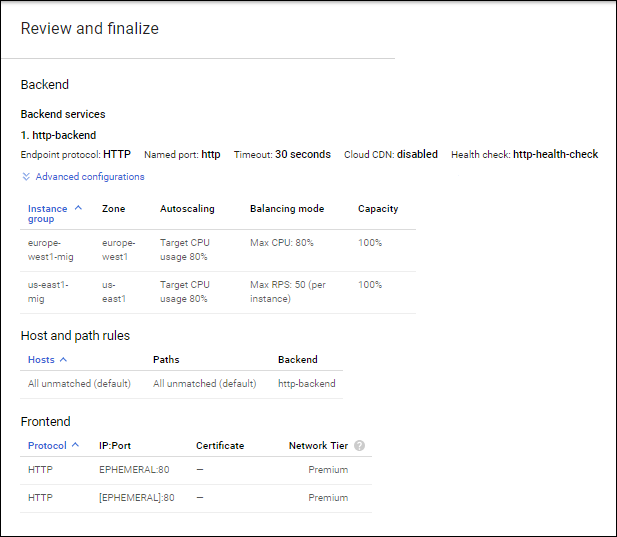
- For creating the HTTP LB you need to configure the Backend and Frontend Services
- Backend services direct incoming traffic to an attached backend or to more. Each backend is composed of an instance group and additional metadata for serving capacity. It is configured with Health checks to determine which instances receive new connections.
- Frontend configured with host and path rules which determine how your traffic will be directed. For the load balancer configuration refer to the attached image.
Step 4: Stress test the HTTP Load Balancer
Create a new VM to simulate a load on the HTTP Load Balancer using siege. Then, determine if traffic is balanced across both backends when the load is high.
If you have tried to access the Load balancer IP_v4 address in you the browser then you can view the page with the contant:
Client IP
Your IP address : 130.211.2.212
Hostname
Server Hostname: us-east1-mig-9ghq
Server Location
Region and Zone: us-east1-b
Now open the siege SSH then run the following commands:
sudo apt-get -y install siege
export LB_IP=[LB_IP_v4]

siege -c 250 http://$LB_IP
Output:
** SIEGE 4.0.2
** Preparing 250 concurrent users for battle.
The server is now under siege…
Then monitor the Frontend Location traffic between North America and the two backends for 2 to 3 minutes. At first, traffic should just be directed to us-east1-mig but when the RPS increases, traffic is also directed to europe-west1-mig.
Step 5: Blacklist the siege-vm
For creating the cloud armor policy in the Console, navigate to Network Security > Cloud Armor then create a policy named as blacklist-siege.
Set the External IP of the siege-vm as condition to make action as deny and deny status as 403 (Forbidden) for the service type Load balancer backend service
Step 6: Verify the security policy
Now again SSH into the siege-vm, to access the load balance:
Command:
curl http://$LB_IP
Output:
<!doctype html><meta charset=”utf-8″><meta name=viewport content=”width=device-width, initial-scale=1″><title>403</
title>403 Forbidden
Now again open the siege SSH then try to simulate a load with the command:
siege -c 250
http://$LB_IP
Output:
[alert] Zip encoding disabled; siege requires zlib support to enable it
** SIEGE 4.0.2
** Preparing 250 concurrent users for battle.
The server is now under siege…
Then explore the security policy logs to determine if this traffic is also blocked.
Note: Alternatively, we can set the default rule to Deny and only whitelist/allow traffic from authorized users/IP addresses and also Cloud Armor security policies create logs that can be explored to determine when traffic is denied and when it is allowed, along with the source of the traffic.
This is how we can protect load balancers from the malicious web browser with the help of Cloud Armor.