Running Windows Containers on Google Compute Engine
Running Windows Containers on Google Compute Engine
Those people who run windows containers want to use a container management platform for scalability and resiliency. Containerisation is a fast-evolving technology, which desired outcome to simplify the deployment and management of distributed applications. When people talk about containers, they usually mean Linux-based containers. A little while back, only Linux processes could be containerized, but Microsoft found support for Windows-based containers in Windows Server 2016 and Windows 10.
Take existing Windows applications, containerized it by using Docker and run it on Windows as an isolated container. There are two types of Windows containers: Hyper-V and Windows Server. We should build Windows containers on microsoft/windowsservercore or microsoft/nanoserver base images.
Creating a Windows VM instance for Containers
In the GCP console, click on Navigation menu > Compute Engine. Create new windows instances by using the following properties.
- Name: windows-container-instance
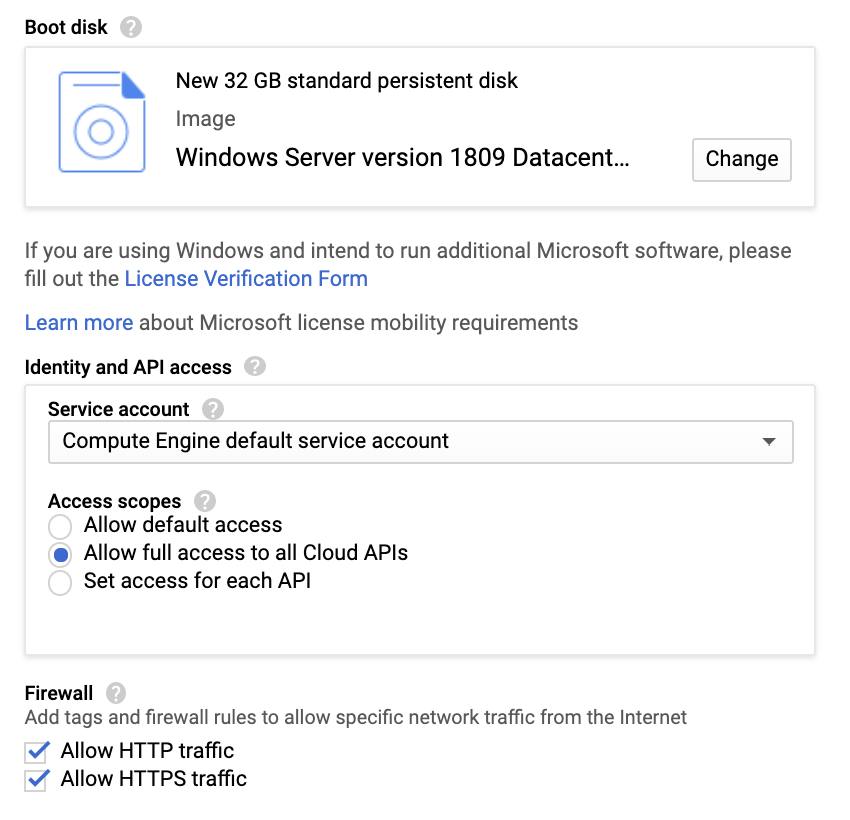
- Boot Disk: Windows Server version 1809 Datacenter Core for Containers
- Identity and API access > Access Scopes: Allow full access to all Cloud APIS
- Firewall: Check both HTTP and HTTPS
To create, it takes a couple of minutes to start up the VM.
Click on RDP (arrow icon) > Set Windows password to set the windows password.
Click Set and copy the new Windows password.

Connecting RDP with Windows VM
Click on the RDP. Put the password that we copied earlier.
In the Windows command prompt (C:\Users\student-xxx), run the following docker command to see the images that are installed by default:
docker images
In the command prompt, see some microsoft windows images installed by default.
Creating a Windows Container App
We use an IIS Web Server in the Windows container. We are using the image as it is and it serves the default IIS page. We have to create a folder called windows-app and add the following folder and files in it.
Directories: /s, /b, content
Files: Dockerfile and content\index.html
Use the “mkdir” command to create directories and “call” command to create files. Also, use the “notepad” command to edit and save the files.
Change the index.html content with the following content.
<html> <head> <title>Windows Containers On Google Compute Engine</title> </head> <body> <h1>Welcome to Compute Engine Windows containers!!!!!</h1> </body> </html>
Building Docker Image
To create the docker image, we have to create the Dockerfile first. Create the Dockerfile and copy the following content in that file.
FROM mcr.microsoft.com/windows/servercore/iis:windowsservercore-ltsc2019


RUN powershell -NoProfile -Command Remove-Item -Recurse C:\inetpub\wwwroot\*


WORKDIR /inetpub/wwwroot


COPY content/ .
Next, we have to build the Docker image and tag it with Google Container Registry (GCR). Also, we have to replace our Project-ID with <Project-ID>.
docker build -t gcr.io/<Project-ID>/iis-site-windows .
After building the docker image, get the output with IIS dependency:
docker images
As an output, see the iis-site-windows image with the latest tag.
Running Windows container
After building the docker image, we are ready to run the Windows container. In the Command Prompt, run the container and expose it on port 80. Also, replace our Project-ID with <Project-ID> here.
docker run -d -p 80:80 gcr.io/<Project-ID>/iis-site-windows
Using the command below, we can check the container status.
docker ps
Copy the External IP of the Compute Engine instance and open it in the new browser with http://<External-IP>
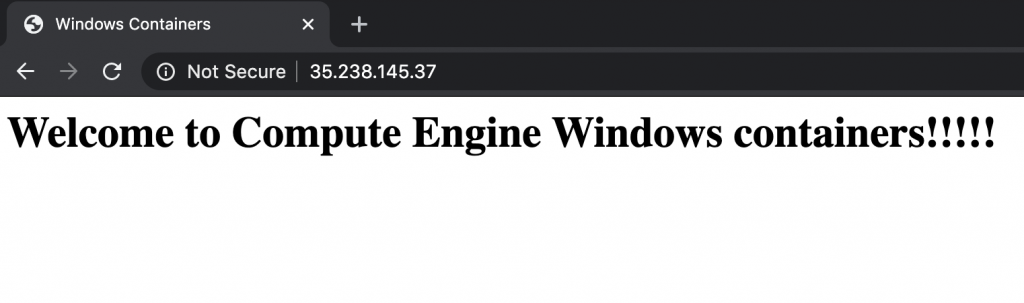
We are successfully running an IIS site Windows container on Compute Engine!!!