Getting Started with Cloud Shell
Getting Started with Cloud Shell
10 June 2021
Cloud Shell provides us with command-line access to computing resources hosted on Google Cloud and it helps us to manage our Google Cloud projects and resources.
In Cloud Shell all the gcloud command-line tool and other libraries are pre-installed that allows us to execute the things as soon as possible. Addition to this, it comes with a built-in code editor with an integrated Cloud Code experience, allowing us to develop, build, debug, and deploy the cloud native apps entirely. Here we can also launch interactive tutorials, open cloned repositories, and preview web apps on a Cloud Shell virtual machine instance.
Cloud Shell properties
- When we start Cloud Shell, it provisions a Debian-based Linux operating system Google Compute Engine virtual machine.
- Instances of Cloud Shell are provisioned on a per-session, per-user basis.
- These instances persist while Cloud Shell session is active and after an hour of inactivity, these session terminates and its VM, discarded.
- For the default Cloud Shell experience, it is allocated with a pre-configured and ephemeral VM.
- We can also customize the environment by Cloud Shell.
- Whenever the Cloud Shell is provisioned 5 GB of free persistent disk is allocated and storage mounted as $HOME directory on the virtual machine instance and this storage is on a per-user basis and is available across projects.
- This Cloud Shell does not time out on inactivity.
- The files that are stored in the home directory, including installed software, scripts and user configuration files like .bashrc and .vimrc, persist between sessions only.
- This Home directory $HOME is completely private and it cannot be modified or accessed by other users.
- AUTHORIZATION: while making a Google Cloud API calls or use a command-line tool that requires credentials to authenticate for more details refer this URL: https://cloud.google.com/shell/docs/auth
- PRE-CONFIGURED ENVIRONMENT VARIABLES: You can also set the environmental variable in the cloudshell. For example: GOOGLE_CLOUD_PROJECT
- ZONE SELECTION: It is always globally distributed across multiple Google Cloud Platform regions and you can also set the required zone and region for the Cloud Shell.
- IMAGE ROLLOUT: In Cloud Shell all the container images are updated on a weekly basis to keep all the prepackaged tools are kept up to date.
- ROOT USER: Once we set up a Cloud Shell session, we get a regular Unix user account with a username based on the email address with which account is created.
- AVAILABLE TOOLS: In the Cloud Shell virtual machine instance, there are multiple pre-installed tools.
- LANGUAGE SUPPORT: In the Cloud Shell, there are multiple language support.
- SAFE MODE: If there is any problem with .bashrc or .tmux.conf files then cloudshell is immediately closed. To resolve this issue we can open the Cloud Shell in safe mode by appending cloudshellsafemode=true to the Cloud ShellURL
Launching Cloud Shell from Console: To launch the Cloud Shell session from the Google Cloud Console, make sure to use the “Activate Cloud Shell button” in the Console.
Launching a stand-alone session: We can launch the stand-alone Cloud Shell session with shell.cloud.google.com and to open the Cloud Shell Editor, you can use ide.cloud.google.com.
Launching with an Open in Cloud Shell link: We can launch the Cloud Shell with the Open in Cloud Shell(OiCS) feature. Here we can customize the launched Cloud Shell experience by supporting the inclusion of URL parameters.
Launching and connecting locally to Cloud Shell with the gcloud command-line tool: We can also launch the cloud shell in local terminal by installing the Cloud SDK. By using the gcloud command-line tool, specifically the gcloud beta cloud-shell command, we can copy files between the local machine and Cloud Shell environment also, establish an interactive SSH session with Cloud Shell.
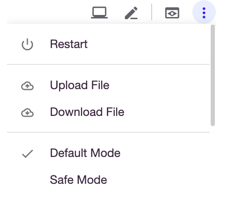
Cloud Shell Usage: We can upload or download the files easily using Cloud Shell.In the Cloud Shell there is a three-dotted More menu, we can select either Upload file or Download file to move the files to and from Cloud Shell.
Cloud Shell command to download files:
cloudshell download test1.md test2.md
Commands to move files from Cloud Shell to Local Machine:
gcloud beta cloud-shell scp cloudshell:~/data.txt localhost:~data.txt
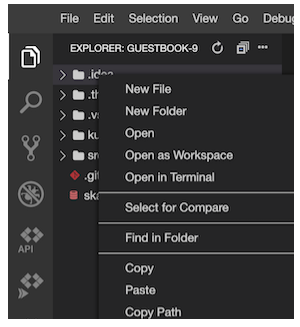
You can also download the files within your Cloud Shell Editor Explorer, refer to the attached screenshot: