Bot with Azure Bot Service
Bot with Azure Bot Service
30 September 2020
Azure Bot Service provides many ways to create bots using core components, including the Bot Framework SDK for developing bots and the bot service for connecting bots to channels. In this topic, you will be able to choose either Python or Node.js template to create a bot using the Bot Framework SDK v4.
Points to remember:
The bot that you want to create is automatically registered with the Azure Bot Service. If you already have a bot hosted elsewhere and you want to register it, So you can refer to this article: Register a bot with Azure Bot Service.
While creating a bot with Azure Bot Service and creating a bot locally, are independent ways to create a bot.
Prerequisites
- Azure account
Create a new bot service:
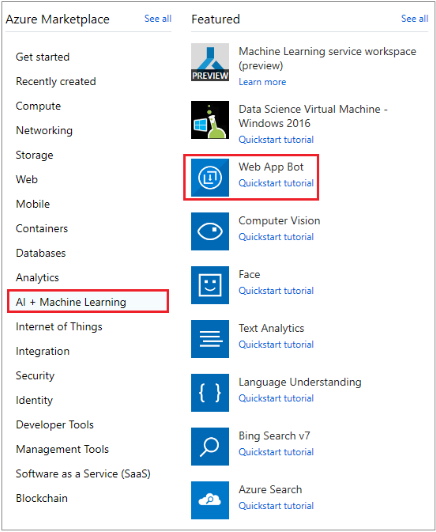
- Firstly, you will need to log in to the Azure portal.
- Lastly, click on create a new resource link on the upper left-hand corner of the Azure portal, and then select AI + Machine Learning -> Web App bot.

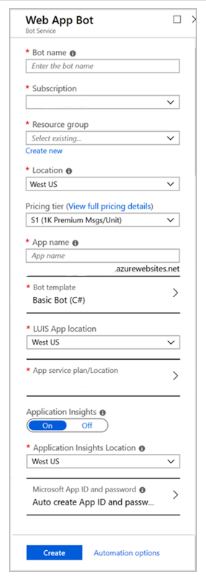
- A new blade with fields will open. That will provide you information related to the Web App Bot.
- In the Bot Service blade, you need to provide the requested information which is required for creating the bot as shown in the below the image.
Settings Suggested value Description Bot Name Bot’s display name The display name for the bot that we assign will appear in all channels and directories. This name can be changed at any time if you want. Subscription subscription You have to select the Azure subscription you want to use. Resource Group ResourceGroup You have to create a new resource group or choose from an existing one or previously you have created. Location location You have to select the geographic location for your resource group. You have to choose the location that is listed. The location that you have selected cannot be changed once the bot is created. Pricing tier F0, F1 Select a pricing tier. You may update the pricing tier at any time if you want. For more information, visit Bot Service pricing. App name A unique name The unique name of the bot. For example, if you name your bot myawesomebot, The name must use some alphanumeric value along with underscore characters. character limit to this field. The App name that you have provided cannot be changed once the bot is created. Bot template Echo bot You have to choose the SDK v4. Select either python or Node.js for Bot creation, then click Select. App service plan/Location Your app service plan You have to select an app service plan location. Your location choice can be any location that is listed in the section, though it’s best way to choose the same location as the bot service. LUIS AccountsOnly available for Basic Bot template LUIS Azure Resource Name Once migrating LUIS Resources over to an Azure Resource, you have to input the Azure Resource name to associate this LUIS Application with that Azure Resource. Application Insights On You have to decide if you want to turn Application Insights On or Off. If you select On, you have also specified a regional location. Microsoft App ID and password Auto-create App ID and password You have to use this option if you need to manually enter a Microsoft App ID and password. Otherwise, you need to create a new Microsoft App ID and password for the bot creation process. While creating registration manually for the Bot Service, please make sure that the supported account types is set to ‘Accounts in any organizational directory’ or ‘Accounts in any organizational directory and personal Microsoft accounts (e.g. Skype, Outlook.com, etc.)’ - You need to click on the Create button to create the service and deploy the bot to the cloud.
You have to confirm that the bot has been deployed by checking the Notifications that you will get. The notifications will change from Deployment in progress step… to Deployment succeeded. After that, you need to click on the Go to resource button to open the bot’s resources blade.
Your Bot is Created successfully, Test it in Web Chat.
Test the Bot
In the Bot Management section of Azure Bot Service, click on Test in Web Chat. Azure Bot Service will load the Web Chat control and will connect to your bot.
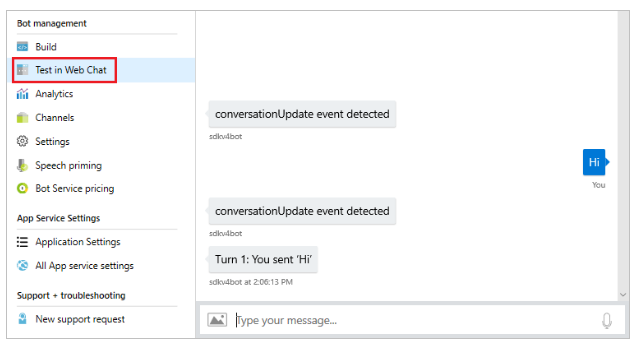
You have to enter a message and your bot should respond.
Manual app registration
A manual registration is required for situations like:
- If you are unable to make the registrations in your organization and need another party to create the App ID for the bot you’re building.
- You need to create manually your own app ID (and password).
Download code
You can download the source code to work on it locally for bot creation.
- Go to the Bot Management section, click on Build.
- You have to click on the Download Bot source code link in the right-pane.
- You have to follow the prompts to download the code, and then unzip the folder.
-
- When you download your bot, you will be given the option to include the settings (containing the keys and secrets) for accessing your bot in your download, which is necessary for your bot to work.
-
Next steps
Once you download the source code, you can continue to develop your bot locally on your machine. Once you test your bot and you are ready to upload the bot code to the Azure portal, You have to follow the instructions listed under set up continuous deployment section to automatically update code after you make changes on the local server.