eSignature in Node.js using HelloSign
eSignature in Node.js using HelloSign
What is an eSignature?
When you create an agreement with any particular person or organization, you have to take signs from all the parties. In old days, it was done by using pen signature. Now you can easily do the eSignature in Node.js using HelloSign. 

Basic requirement of HelloSign:
- First, you have to create an account on HelloSign (https://app.hellosign.com/account/logIn?from_logout=1).
- Create your API key (https://app.hellosign.com/home/myAccount#api)
There are mainly 3 ways to send a signature request using the HelloSign API:
- Using files
- Using template
- Using files and form fields
In this blog, we are going to talk about “Using files and form fields” feature of Hello Sign.
Using files and form fields:
Embedded Signing: Embedded signing allows you to have users sign signature requests on your application in an iFrame. The documentation below describes how embedded signing works.
Text Tags Field Parameters: In-Text Tags, involves two parameters:
- use_text_tags [boolean] (by default is set to 0)
- hide_text_tags [boolean] (by default is set to 0)
Using “use_text_tags: 1”, you can enable HelloSign UI to interact with the signer. The HelloSign UI likes signature box, text box, date box and many more. With “hide_text_tags: 1”, you can hide used above below tags in your proposal using the background color to white. Start and end a tag, use square brackets [ ] in your proposal document. Within the square brackets, you use the pipe “|” to divide tags. The first part of the tag describes the type of tag. The second part describes if it is required or not. The third part describes which Signer is going to sign the proposal document. Other two tags are optional for unique IDs. For example:
[sig|noreq|signer1|Label|UniqueId]
[text|noreq|signer1|Label|UniqueId]
[date|noreq|signer1|Label|UniqueId]
In any document, you can use N number of Signers like “signerN” in the document, so that N numbers signers will do the sign in the same document. For example,
[sig|req|signer1|OptionalLabel|OptionalID]
[sig|req|signerN|OptionalLabel|OptionalID]
Three main text tags of HelloSign:
Following 3 tags are used for providing a different style for signer and you can provide for multiple signers.
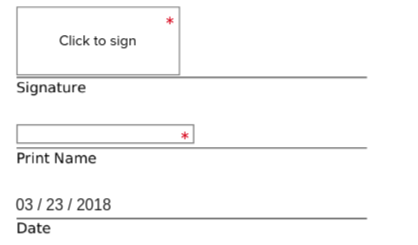
- [sig|req|signer1] This sig tag is used for providing the signature box, where can signer draw or upload a signature.
- [text|req|signer1] This text tag is used for providing text box, where signer types its name.
- [date|req|signer1] This date tag is used for providing a date, where current date is automatically populated.
When you specified above three tags in your PDF then it will look like: 

In static PDF, you can edit PDF using online editor and set above three tags (like [sig|req|signer1], [text|req|signer1] or [date|req|signer1]) where you want to set signature box, text box and date box in the PDF. Please keep mind that, while you editing static PDF online, set background white color to the above tags, so that these tags will be invisible.
In Dynamic PDF, when you generate PDF in through code you can set above three tags(like [sig|req|signer1], [text|req|signer1] or [date|req|signer1]) where you want to set signature box, text box and date box in the PDF. Please keep mind that, while you generating Dynamic PDF, set background white color to the above tags, so that these tags will be invisible.
Server-side code Hello Sign configuration (Backend):
- Create a Signature ID for signers:
You have specified that signer[1] is required to sign and signer[2] is required to initial. The corresponding API call for this might look something like this:
var hellosign = require('hellosign-sdk')({key: "---Hello Sign API key---"});
process.env.NODE_TLS_REJECT_UNAUTHORIZED = "0";
(In Node we have to set process.env.NODE_TLS_REJECT_UNAUTHORIZED = "0")
var options = {
 clientId: "---client id here---",
 subject: 'Proposal signature request',
 message: 'Awesome, right?',
 use_text_tags: 1,
 hide_text_tags: 1,
 signers: [
 {
 email_address: "signer1 emailAddress1",
 name: "text1"
 },
 {
 email_address: "signer2 emailAddress2",
 name: "text2"
 }
 ],
 files: ["---define path of PDF which is going to attached for e-Signature process---"]
};
hellosign.signatureRequest.createEmbedded(options)
.then(function (response) {
 // Handle success response
 // you can store following 3 IDs (Signature ID, Signer1 ID, Signer2 ID)
})
.catch(function (err) {
 // Handle error response
});
- Get Signature URL for specific signer based on signature ID:
var hellosign = require('hellosign-sdk')({key: "----Hello Sign API key----"});
process.env.NODE_TLS_REJECT_UNAUTHORIZED = "0";
var signUrlData = hellosign.embedded.getSignUrl(signatureId)
 .then(function (response) {
 // Handle success response
 })
 .catch(function (err) {
 // Handle error response
 });
When you open sign URL for any specific signer then you can find the following boxes will be open in your application: 

<script type="text/javascript" src="https://s3.amazonaws.com/cdn.hellosign.com/public/js/hellosign-embedded.LATEST.min.js"> <script>
HelloSign.init("CLIENT_ID");
HelloSign.open({
 url: "CLAIM_URL",
 allowCancel: true,
 messageListener: function(eventData) {
 // do something
 }
});
When you have done with both sides(Signer1 sign and Signer2 sign) signing process then you can simply preview the PDF or Download the PDF.
Preview/Download PDF:
var hellosign = require('hellosign-sdk')({key: "-------hello sign API key--------"});
process.env.NODE_TLS_REJECT_UNAUTHORIZED = "0";
hellosign.signatureRequest.download(updatedProposalData.signatureRequestId, {file_type: 'zip'}, function (err, response) {
var filePath = config.uploads.zipFiles.dest + proposalId + '.zip';
var file = fs.createWriteStream(filePath);
 response.pipe(file);
 file.on('finish', function () {
 file.close();
 });
});
After successfully download a zip file and extract the zip file and get your signed PDF, sample code in Nodejs:
var extract = require('extract-zip')
extract(path.join(__dirname, '---path of your store zip file path---'),
 {dir: path.join(__dirname, '---path to store extract PDF file---')}, function (err) {
 if (err) {
 // Handle error response
 } else {
 // extraction is complete
 fs.unlink(path.join(__dirname, '---path of your store zip file path---'), function (err, data) {
 // Remove zip from our system
 });
 }
});
Note:
-
-
- When you get sign URL for signer1 (For example, when you get sign URL for signer 1 based on “hellosign.embedded.getSignUrl” API) Hello Sign API internally recognize, which signer is it is and open respective specific sign and a text box for it based on signer ID.
- If you are using Hello Sign API in test mode then you have to set “test_mode”: 1 on server-side and “skipDomainVerification”: true on client-side.
-
Reference:


