
Connecting the Cloud SQL using the Cloud SQL Proxy
Connecting the Cloud SQL using the Cloud SQL Proxy
23 October 2020
Introduction
To host a dynamic website we are going to use Cloud SQL, AppEngine, Cloud SQL proxy, and PHP.
What is Cloud SQL?
Cloud SQL is a MySQL database service that is hosted on Google Cloud and does not require any software installation and maintenance because the service is provided by Google Cloud. The Google Cloud should be maintained, managed, and administered by itself. Just as regular MySQL database, Google Cloud SQL also lets you create, update, configure and utilize a relational database.
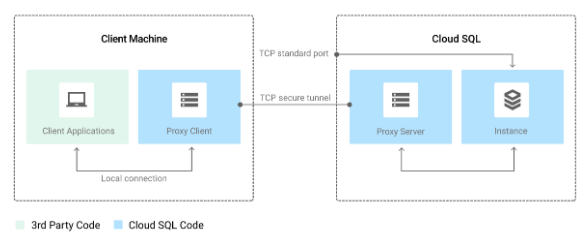
What is Proxy?
The proxy uses a secure tunnel to communicate with its companion process running on the server. We can use the proxy in the absent of the IP address. We can take App Engine as an example here. Proxy acts as a Local client. Application communicates with the proxy with the standard database protocol used by your database.
Why Cloud SQL Proxy?
It provides secure access to the Cloud SQL Second Generation Instance. The proxy automatically encrypts the traffic to and from the database.
The Proxy handles the authentication with the Cloud SQL, in absent of the static IP address.
Requirements
The following details that you need to take care of:
- Cloud SQL Instance, the proxy should build the connection.
- Where it will should listen the data is coming.
- Where to ding the credentials.
It’s your choice to configure the proxy as it listin on TCP port or on a Unix socket. If you chose the Unix socket then create a socket first; usually, we create /cloudsql/ directory.
For TCP, the proxy listens on localhost by default
Note: The Cloud SQL Proxy does not support Unix sockets on Windows.
Creating a Cloud SQL instance
You can create a Cloud SQL instance by using the gcloud command as
gcloud sql instances create [INSTANCE_NAME] --tier=[MACHINE_TYPE] --region=[REGION]
For Example:
gcloud sql instances create instance1 --tier=db-n1-standard-2 --region=europe-west2
Set the password for “root@%” MySQL user:
gcloud sql users set-password root --host=% --instance [INSTANCE_NAME] --password [PASSWORD]
Once the instance creation is done then you can find the instance in cloud SQL. Then find out the INSTANCE_CONNECTION_NAME for the instance under the Instance details page. It uses the format PROJECT_ID:REGION:INSTANCE_ID.
Cloud SQL Admin API
In order to communicate with the database, you have to enable the Cloud SQL Admin API, if it is not enabled already. Follow the steps below to enable the Cloud SQL Admin API.
- Click on APIs and Services
- Click ENABLE APIS AND SERVICES.
- Search the “Cloud SQL Admin API” using the search box.
- Enable the API if it is not.
Connect to the Cloud SQL using Cloud SQL Proxy
- Enable the Cloud SQL Admin API. That we have done above
- Install the proxy in cloud shell by executing the command below
- wget https://dl.google.com/cloudsql/cloud_sql_proxy.linux.amd64 -O cloud_sql_proxy
- chmod +x cloud_sql_proxy
- Make sure to the default service account should have below IAM role
- Cloud SQL Client (Recommended)
- Cloud SQL Editor
- Cloud SQL Admin
- Or else create the new service account and follow the below instructions
- Click Create a service account.
- In the Create service account dialog, provide a descriptive name for the service account.
- For Role select any of the Role mentioned above
- Change the Service account ID to a unique, easily recognizable value.
- Click Furnish a new private key and confirm that the key type is JSON. and click Create
- Start the proxy Using the Unix Socket
- sudo mkdir /cloudsql; sudo chmod 777 /cloudsql
- ./cloud_sql_proxy -dir=/cloudsql &
- Start the client session
- mysql -u <USERNAME> -p -S /cloudsql/<INSTANCE_CONNECTION_NAME>
- Replace <USERNAME> and <INSTANCE_CONNECTION_NAME> with yours.
- It will ask for a password, then enter the password that you have set while creating the database.
- You should see the mysql prompt.