Implement CRUD APIs using Typescript and Node JS
Implement CRUD APIs using Typescript and Node JS
05 January 2022
Introduction
If you want to create CRUD APIs using typescript and node js. You are at the right place. Here you will learn to write APIs from scratch.
Typescript is a superset of javascript and it supports static typing. For large Javascript project, adopting Typescript may result in robust software while still being deployable where a regular javascript application run.
Follow the below steps and get your CRUD APIs ready :
Step 1: Initialize your project
- Hit npm init on your terminal
It will create package.json file in your project
Step 2: Install necessary packages
- npm install typescript express ts-node
Why are these 3 packages required?
We will have to create and execute typescript classes. For execution of typescript classes we would need a typescript execution engine. ts-node is a typescript execution engine. Its JIT transforms Typescript into Javascript, enabling you to directly execute typescript on Node.js without precompiling
To use typescript with Node we use this package. It helps building typescript project
Express is an application framework which we used to develop REST APIs which provides a simple routing for requests made by clients
Step 3: Create app.ts file
import * as express from 'express';
import * as bodyParser from 'body-parser';
import * as mongoose from 'mongoose';
import AppRoutes from './routes/index';
import DevConfig from './config/environments/development';

class App {
  public app: express.Application;
  public port: number;
  public config = new DevConfig();
  appRoutes = new AppRoutes()

  constructor(controllers, port) {
    this.app = express();
    this.port = port;

    this.initializeMiddlewares();
    this.initializeRouters(this.appRoutes.routers);
  }

  private initializeMiddlewares() {
    this.app.use(bodyParser.json());
  }
  // Initialize all the routes of the application
  private initializeRouters(router) {
    router.forEach(routes => {
      this.app.use('/', routes);
    });
  }

  // Server will listen to this port
  public listen() {
    this.app.listen(this.port, () => {
      console.log(`App listening on the port ${this.port}`);
    });
  }
  // Connecting to mongo DB
  public connectToTheDatabase() {
   console.log("Connecting to mongo DB", this.config.dbURL);
    mongoose.connect(this.config.dbURL);
  }
}

export default App;
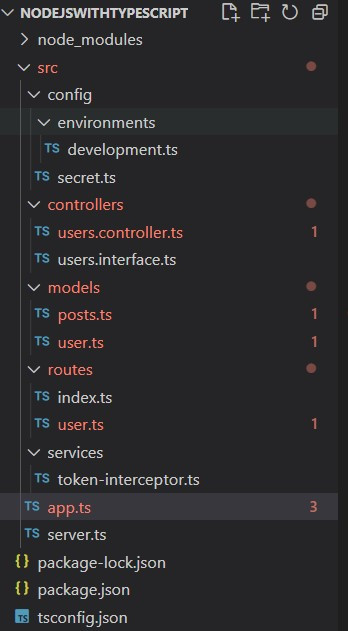
- app.ts: It is a class which does the following things:
- Calls middleware
- Connects to MongoDB
- Starts the server
- Initialize the routes
So whenever we want to use any middleware in our application. We will have to import it and use it inside initializeMiddleware function in the app.ts file


Step 4: server.ts file
import App from './app';

const app = new App(
  5000
);

app.listen();
app.connectToTheDatabase();
- Server.ts:This will be the main entry file from where the execution starts.
Step 5: Create Router file
- Routes:
- If you want to create a new route file
- Create a new .ts file inside routes folder
- Create an object of the respective controller to call its methods.
- We are gonna use methods of Express app object. So we have to import express and create an instance of express.Router()
- We can now start adding routes.
- Export the instance so that we can fetch all the routes in routes/index file
import * as express from 'express';
import UserController from '../controllers/users.controller';
const userRoutes = express.Router();
const controller = new UserController();

userRoutes.get('/fetch', controller.getAllPosts);
userRoutes.post('/create', controller.createAPost);

export default userRoutes;
Step 6: Models
- Routes:
- Create a schema with global scope.
- Create a class of model and its methods will be model methods which we can call in controller by creating instance of model class
import * as mongoose from 'mongoose';

const userSchema = new mongoose.Schema({
		name: String,
		content: String,
		title: String,
		class: String
	});

class UserModel {

	user = mongoose.model('user', userSchema);

	public saveUser(posts, callback) {
		this.user.create(posts, callback)
	}

	public fetchUser(id, callback) {
		this.user.findById(id, callback)
	}
}

export default UserModel
Step 7: Create controller class
- Controller:
- The main business logic you will write here.
- All the database related operations will be done inside the controller.
- To call any model method, we have to create an object of the model class.
- Response will be returned from the controller.
- In typescript, We have to create a class of each controller, Methods of this class will contain the business logic for respective routes.
- Export object of controller class, so that it will be accessible in the router file to call those methods by creating object of the controller class.
import * as express from 'express';
import UserModel from '../models/user';

class UserController {
	user = new UserModel();  // Object of User model
	private posts = [
		{
			name: 'Marcin',
			content: 'Dolor sit amet',
			title: 'Lorem Ipsum',
		}
	];
      // Business Logic for GET API
	getAllPosts = (request: express.Request, response: express.Response) => {
		response.send(this.posts);
	}

     // Business Logic for POST API
	createAPost = (request, response) => {
           // Moongo DB Insert Operation
		this.user.saveUser(this.posts, (err, user) => {
			if (err) {
				response.send(err)
			} else {
				response.send(user);
			}
		})
	}
}

export default UserController;
Step 8: Run the server
To run our project, we need to add a script in our package. Json
“scripts”: {
    “dev”: “ts-node ./src/server.ts”
}
Command: Run npm run dev


