How to Accept Payment on your site using Open Edge Payment Integration?
How to Accept Payment on your site using Open Edge Payment Integration?
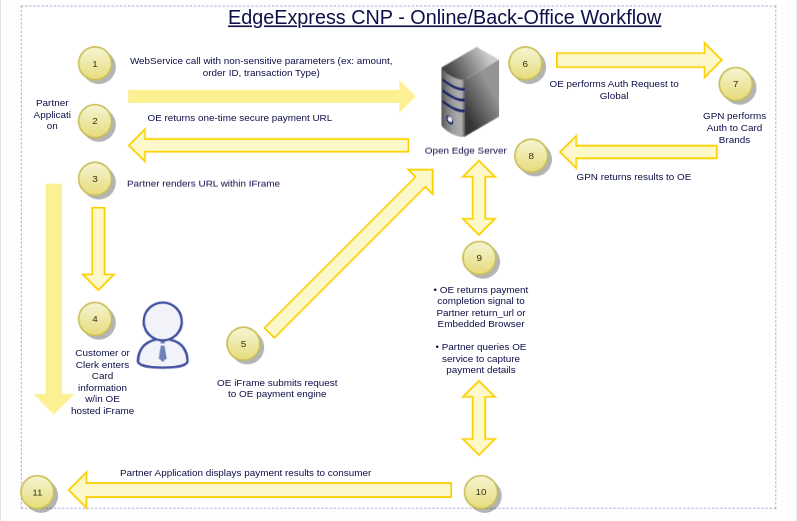
OpenEdge is the payment gateway that accepts Credit and Debit Cards and other Payment Types. The only reason why it is different from other Payment Gateways is OpenEdge handles the Payment Process when we say it handles Payment Process which means we don’t have to worry about implementing the Pay Button click event and handling all the business logic of the Payment.
We just have to display the Open Edge payment page in an iframe and Open Edge lets us sit back and the rest payment process will be handled by itself. To store details about each payment in our database we can fetch payment details using unique ORDER ID from Open Edge using its Query Payment API. It also maintains the Response Code field and depending on it we can maintain the response code in our application database.
Workflow of the Open Edge Payment Process


Workflow of the OpenEdge payment
Whenever dealing with Payment Gateway Integration I prefer to add a developer account and getting test keys for XWebID, XWEBTERMINALID, XWEBAUTHKEY that are used to implement the Payment Process in the App. So first we will complete the Open Edge Developer Console and then will move to payment integration.
Integration Methods
Prerequisite:
- OpenEdge API supports XML data so we have to make sure we send XML data while calling those OpenEdge APIs. For converting JSON to XML we can use js2xmlparser npm module.
-
- This module will convert JSON object to XML and then we can send the data to the OpenEdge APIs.
-
- Axios npm package can be used to make http requests from node.js and it supports the Promise API.
- Xml2json npm package is required to conjs2xmlparservert xml response of Open Edge APIs to json format. So that we can return json response from our Node js API.
There are two available methods of integrating with the EdgeExpress CNP API:
Two Step Integration and One Step Integration.
Two Step Integration
- First POST request to:
- Order ID is the key which uniquely identifies each transaction. This field is used for tracking transactions, and for follow-on transactions (such as Refunds). If an ORDERID is passed, it will be echoed back in the response to the initial transaction, as well as on any follow-on transactions. ORDERID is required for Card-Not-Present transactions. It should be of alphanumeric type.
- API – POST: https://ee.test.paygateway.com/HostPayService/v1/hostpay/paypage/.
- Body Params:
<REQUEST> <XWEBID>800000032500</XWEBID> <XWEBTERMINALID>80033480</XWEBTERMINALID> <XWEBAUTHKEY>VXRCdAhYkrSPCF9ndqucneLPQBKV5Xq0</XWEBAUTHKEY> <TRANSACTIONTYPE>CREDITSALE</TRANSACTIONTYPE> <AMOUNT>10.00</AMOUNT> <ORDERID>1577282979</ORDERID> <ALLOWDUPLICATES>TRUE</ALLOWDUPLICATES> <HOSTPAYSETTINGS> <RETURNOPTION> <RETURNURL>{ _self / URL }</RETURNURL> </RETURNOPTION> <HOSTPAYSETTINGS> </REQUEST> - Note: We have to set RETURN_URL i.e. where user should be redirected after successful payment in the request body,
- Display the payment page at:
https://ee.paygateway.com/HostPayService/v1/hostpay/paypage/{sessionToke}- Website and Mobile application can use this Open Edge payment page URL to display it in the iframe and allow users to redirect to the checkout page of the application.
One Step Integration
Direct “POST” request to: https://ee.paygateway.com/HostPayService/v1/hostpay/paypage. The payment HTML page will be returned.
Track the success of the payment transaction and store the details of the transaction in the database.
- We should call a Query transaction API of Open Edge in some interval of seconds to track the completion of the payment and check the response code for the transaction of the mentioned Order ID.
Query Transaction API of Open Edge:
POST: https://ee.test.paygateway.com/HostPayService/v1/directpay/express
Header: sw-apikey
Request Body:
<REQUEST>

    <XWEBID>800000032595</XWEBID>

    <XWEBTERMINALID>80033489</XWEBTERMINALID>

    <XWEBAUTHKEY>VXRCdAhYkrSPCF9ndqucneLPQBKV5Xq6</XWEBAUTHKEY>

    <TRANSACTIONTYPE>QUERYPAYMENT</TRANSACTIONTYPE>

    <ORDERID>1577282979</ORDERID>

</REQUEST>


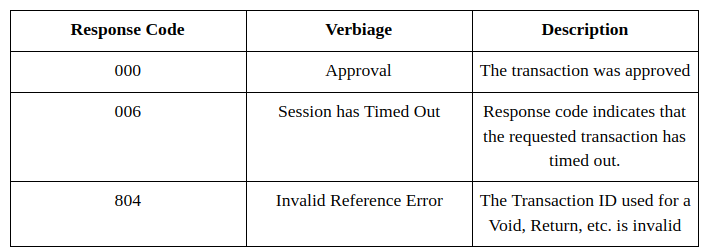
Table of Response codes of Open Edge Query Transaction API
Payment page url generated from the Open Edge API will get expired after 5 minutes. So we have to keep track when the paypage URL has been generated and we have to refresh the pay page URL after every 5 minutes. We can track expiration of the payment page when the Query Transaction API returns 006 response code in its response.
Payment Page Branding
Payment Page Branding EdgeExpress gives the integrator great flexibility over the experience of the Payment Page. The following “Payment Page Branding – Body” table includes the fields for branding of the payment page. Please note that you may pass these parameters through the integration with every transaction using XML objects and fields. Also note that some request objects are not applicable to these branding fields. Each field in the table below can include the XML-formatted values to to format paypage branding.
Payment Page Branding – Body:
All body branding fields must be nested within <HOSTPAYSETTING>, <CUSTOMIZATION>, <BRANDING>, <BODY> as demonstrated in the below sample snippet for customizing the payment page branding.
We can change the label and color of the submit button and also the body of the page.
<HOSTPAYSETTING>

<CUSTOMIZATION>

           <PAGE>

<SUBMITBUTTON><LABEL>Pay and Reserve</LABEL></SUBMITBUTTON>

</PAGE>

<BRANDING>

<SPECIALCSS>

<SECTION-HEADER-FONT-SIZE>16px</SECTION-HEADER-FONT-SIZE>        </SPECIALCSS>

<BODY>

<BACKGROUNDCOLOR>#FFFF00;</BACKGROUNDCOLOR>                  <COLOR>#0F0F0F;</COLOR>

<FONTFAMILY>TIMES NEW ROMAN, HELVETICA-NEUE, HELVETICA,ARIAL,SANS-SERIF;</FONTFAMILY>

 <FONTSIZE>12PX;</FONTSIZE>

 <INPUTFIELDHEIGHT />

</BODY>

<BTN><BACKGROUNDCOLOR>#000000</BACKGROUNDCOLOR></BTN>

</BRANDING>

 </CUSTOMIZATION>

</HOSTPAYSETTING>


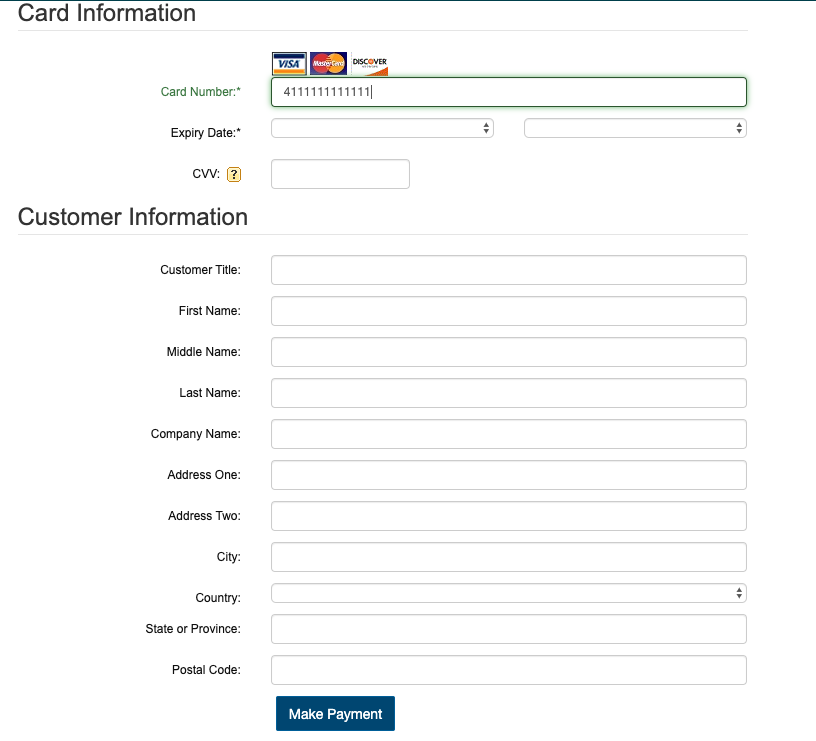
Open Edge Payment page
If we don’t want to display all the fields of the Open Edge payment form then we can set <VISIBLE>false</VISIBLE> for the respective field in the pay page URL POST request body params.
Syntax:
<BILLINGCUSTOMERTITLE><VISIBLE>false</VISIBLE></BILLINGCUSTOMERTITLE>
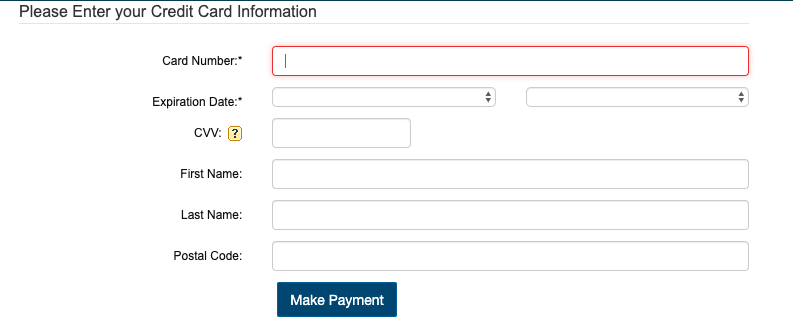
We can customize the payment page as shown in the figure below by setting VISIBLE and changing LABEL properties for the fields: CARDNUMBER, EXPIRYDATE, BILLINGCUSTOMERTITLE, BILLINGMIDDLENAME, BILLINGCOMPANY, BILLINGADDRESSONE, BILLINGADDRESSTWO, BILLINGCITY, BILLINGSTATEORPROVINCE, BILLINGCOUNTRYCODE, CUSTOMERINFO, CARDINFO


Customized Payment page
Conclusion
OpenEdge is a beautiful solution to an ugly problem of how can a site accept credit cards. It makes it super easy for people with just minimal developer experience to integrate payments. Developer just have to generate a payment page URL and he doesn’t have to worry about the security of the credit card information and it is super easy to fetch payment details of any transaction by just hitting a Query transaction API of Open Edge. We had so much fun going over the integration guide and actually doing all the steps.
HAPPY CODING!


