5 Steps to Test Push Notification in the Simulator
5 Steps to Test Push Notification in the Simulator
You might think can we even test push notification in simulator?
Yes from xcode 11.4 and above you can test push notifications in simulator.
Here is what xcode 11.4 beta release notes says:-
“Simulator supports simulating remote push notifications, including background content fetch notifications. In Simulator, drag and drop an APNs file onto the target simulator. The file must be a JSON file with a valid Apple Push Notification Service payload, including the “aps” key. It must also contain a top-level “Simulator Target Bundle” with a string value that matches the target application‘s bundle identifier.”
But wait! Why do you need to test Push Notification in simulator?
- No need to setup provisioning profile and certificate to test Push Notification working.
- No need to for any third party tools to push the payload.
- It even includes background content fetch notifications.
- It works amazingly even with Rich notifications having videos, images and controls.
And the list continues so on and so forth.
Requirements to test the push notifications on the simulator:
- Xcode 11.4 and above
- Mac OS 10.15.2 and above.
Let’s the 5 steps to test the Push notifications:
Step 1:
Create a new project in xcode you can choose either Storyboard or SwiftUI it doesn’t matter we are good with both.

I have added a label and a background color. So, that we can see something when the app is launched rather than a white screen.
Step 2:
Ask permission for the push notifications, we will do this in AppDelegate.
First we need to import user notifications, add the following line on the top of the AppDelegate file:
import UserNotifications
Now create a function in the AppDelegate file as below:
func askForPushNotification() {

        let center = UNUserNotificationCenter.current()

        center.requestAuthorization(options: [.alert, .sound, .badge]) { granted, error in

            // Enable or disable features based on authorization.

        }

 }
In the above code we request for authorization with notifications with alerts, sound and a badge icon.
We don’t perform any action even if the permission is denied.
Check this Apple document on Asking permission: http://developer.apple.com/documentation/usernotifications/asking_permission_to_use_notifications
Now call this method from the “application(_:didFinishLaunchingWithOptions:)” method of AppDelegate.
Step 3:
Now run the application you will see an alert asking for push notifications.
Allow the permissions and put your app background.
By the way, we have a new home button on the simulator along with screenshot and rotate buttons.

Step 4:
Now we will test push notification by pushing a payload.
We would need a JSON file with a valid Apple Push Notification Service payload.
Open a new text file and add the following JSON:
{

   "Simulator Target Bundle": "com.sumit.ghosh.TestPushNotification",

   "aps":{

       "alert": {

           "title": "Push Notification",

           "subtitle": "Xcode 11.4 beta is here",

           "body": "🥰 Woohoo! Push notification in simulator! 😍"

       },

      "badge":1,

      "sound":"default",

   }

}
Save this file as .apns.
Don’t forget to add the “Simulator Target Bundle” it is important without that it will not work. Make sure to change the identifier with your projects bundle identifier.
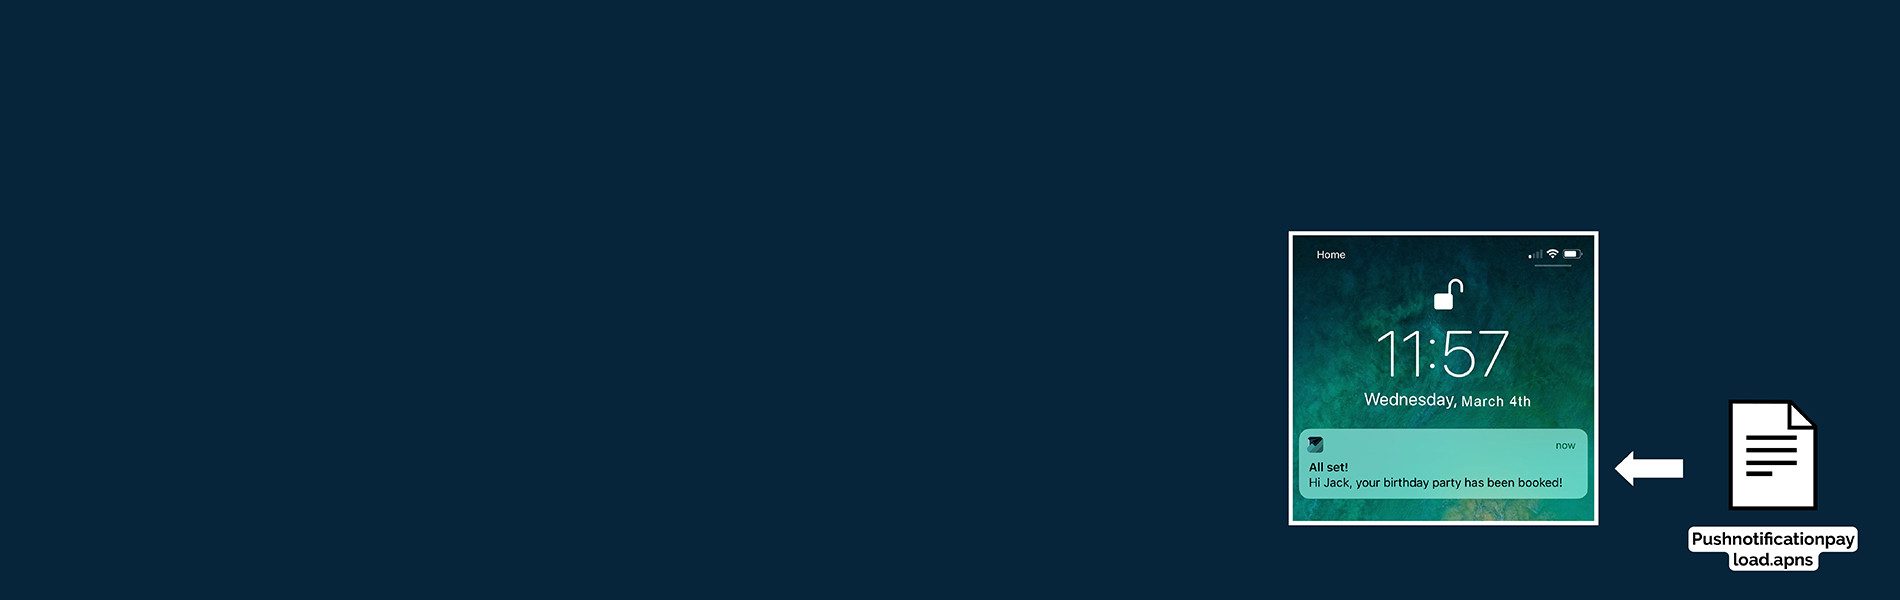
Now in order to see the magic drag and drop the file to the simulator.
Yay! You see the push notification with sound and a badge icon on your app.

Step 5:
I am already done with testing push notifications in the simulator then what is this step for?
There is one other way by which you can push the payload that is by the command line.
$ xcrun simctl push <device-identifier> com.app.bundle-identifier testPayload.apns
Here you need three informations:
- Device identifier – You can get the device identifier in Xcode > Window > Device and Simulator and choose the device to get the identifier.
- App’s Bundle Identifier.
- Path to your .apns file.
Here is an example:
Make sure to change the above fields depending on your project and device.
xcrun simctl push B14B3EC2-F7E8-4E7F-A442-BE1EDEA3C141 com.sample.NotificationSample /Users/sumitghosh/Desktop/pushnotificationPayload.apns
If we add the “Simulator Target Bundle” we can skip it from the above command.
