In the world of distributed systems, scaling and hosting dedicated game servers for online, multiplayer games is challenging. It’s not surprising that for game server scaling is usually done by proprietary software.
Here Kubernetes comes in picture “The de facto standard for building complex workloads and distributed systems across multiple clouds and servers”
The combination of software containers and Kubernetes lets us build a solid baseline for running any type of software at scale – from deployment, health checking, log aggregation, scaling and more, with APIs to control these things at almost all levels.
What is dedicated game server: A dedicated game server is usually hosted somewhere on the internet to facilitate synchronizing the state of the game between players, but also acts as a referee to prevent cheating.
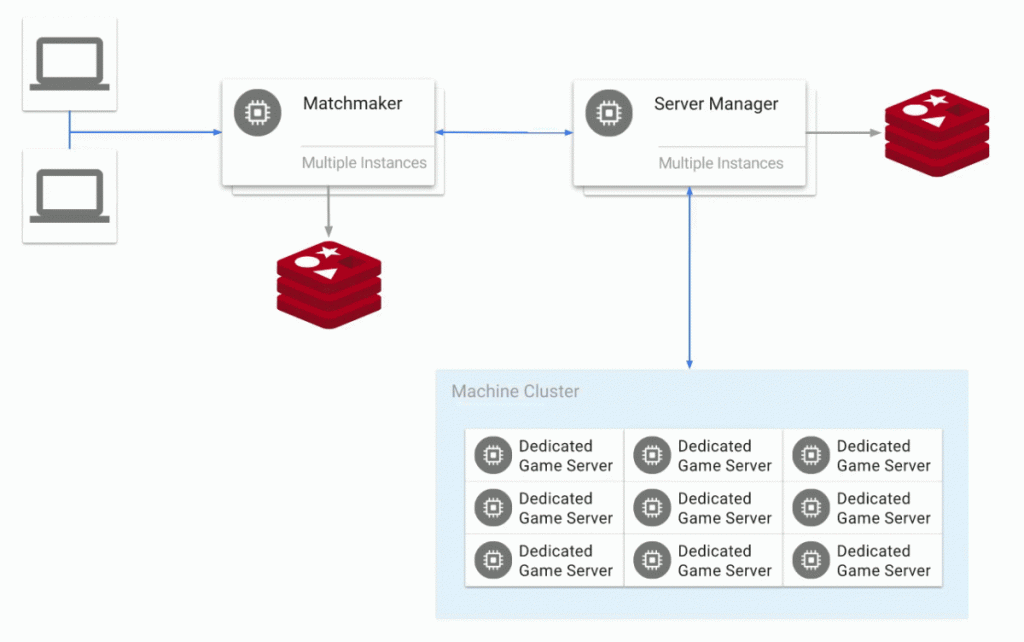
Here’s an example of a typical Kubernetes dedicated game server setup:

How it works?
- Players connect to a type of matchmaker service, which groups them (often by skill level) to play a match.
- The matchmaker tells a game server manager to provide a dedicated game server process on a cluster of machines as soon as the players are matched for a game session.
- The game server manager creates a new instance of a dedicated game server process that runs on one of the machines in the cluster.
- The game server manager determines the IP address and the port that the dedicated game server process is running on, and passes that back to the matchmaker service.
- The IP is passed and ported back to the player’s clients by the matchmaker.
- The players are connected directly to the dedicated game server process and play a multiplayer game against one another.
Agones is in one of the best examples of Open-source, multiplayer, dedicated game-server host built on Kubernetes
How to set up a dedicated game server Google Kubernetes Engine?
- Create a container image of a popular open-source dedicated game server (DGS) on Linux using Docker.
- Generate a new container image:
Run Docker build command to generate the container image and tag it.docker build -${GCR_REGION}.gcr.io/${PROJECT_ID}/openarena:0.8. - Upload the container image to an image repository:
gcloud docker -- push \${GCR_REGION}.gcr.io/${PROJECT_ID}/openarena:0.8.
- Generate a new container image:
- The assets should be stored on a separate read-only persistent disk volume and mounted in the container at run-time.
- Create a small Compute Engine VM instance using gcloud:
gcloud compute instances create openarena-asset-builder --machine-type f1-micro \ --image-family debian-9 \ --image-project debian-cloud \ --zone ${zone_1} - Create Disk:
gcloud compute disks create openarena-assets \ --size=50GB --type=pd-ssd\ --description="OpenArena data disk. Mount read-only at /usr/share/games/openarena/baseoa/" \ --zone ${zone_1} - Attach disk to the instance:
gcloud compute instances attach-disk openarena-asset-builder \
--disk openarena-assets --zone ${zone_1}
- Create a small Compute Engine VM instance using gcloud:
- Setup and configure basic scheduler processes using the Kubernetes and Google Cloud APIs to spin up and down nodes to meet demand.Creating a Kubernetes cluster on Kubernetes Engine:
- Create a VPC network for the game named game:
gcloud compute networks create game
- Create a firewall rule for OpenArena:
gcloud compute firewall-rules create openarena-dgs --network game \
--allow udp:27961-28061
gcloud container clusters create openarena-cluster \
--network game --num-nodes 3 --machine-type n1-highcpu-4 \
--addons KubernetesDashboard
After the cluster has started, set up your local shell with the proper Kubernetes authentication credentials to control your new cluster:
gcloud container clusters get-credentials openarena-cluster
- Create a VPC network for the game named game:
- Configuring the assets disk in Kubernetes:
- Create and apply asset-volume.yaml, which contains the definition of a Kubernetes persistentVolume resource that will bind to the assets disk you created before:
kubectl apply -f openarena/k8s/asset-volume.yaml
- Create and apply asset-volumeclaim.yaml. It contains the definition of a Kubernetes persistentVolumeClaim resource, which will allow pods to mount the assets disk:
kubectl apply -f openarena/k8s/asset-volumeclaim.yaml
- Confirm that the volume is in Bound status by running the following command:
kubectl get persistentVolume
- Create and apply asset-volume.yaml, which contains the definition of a Kubernetes persistentVolume resource that will bind to the assets disk you created before:
- Setting up the scaling manager:
The scaling manager is a simple process that scales the number of virtual machines used as GKE nodes, based on the current DGS load. Scaling is accomplished using a set of scripts that run forever, that inspect the total number of DGS pods running and requested, and that resize the node pool as necessary.The scripts are packaged in Docker container images that include the appropriate libraries and the Cloud SDK. The Docker images can be created and pushed to gcr.io using the following procedure.If necessary, put the gcr.io GCR_REGION value and your PROJECT_ID into environment variables for the build and push script. You can skip this step if you already did it earlier when you uploaded the container image.export REGION=[GCR_REGION] PROJECT_ID=[PROJECT_ID]
Change to the script directory
cd scaling-manager
Run the build script to build all the container images and push them to gcr.io:
./build-and-push.sh
Using a text editor, open the Kubernetes deployment file at scaling-manager/k8s/openarena-scaling-manager-deployment.yaml.
The scaling manager scripts are designed to be run within a Kubernetes deployment, which ensures that these processes are restarted in the event of a failure.
kubectl apply -f openarena/k8s/asset-volumeclaim.yaml


