24 December 2020
Localization vs. Internationalization
Localization refers to customizing the look and feel of your Mobile or Web App for users of different regions and dialects.
Also, you may have come across the word internationalization while referring to the internet for localization-related stuff.
What the heck is internationalization then? Is it different from localization?
So, the answer is yes. Internationalization is the inclusion of a thought process for making the product global while developing or designing the product and writing the code.
It should always be a fundamental process of development or designing the product and should go hand in hand. So, the code is ready to incorporate the localization content and configuration related changes.
An internationalized product can be efficiently launched for different locales(dialect with its regional variations) and is less prone to errors.
Adding Localization to your App
Now, I will explain in detail the step by step process of adding localization to the React app. However, the process is roughly the same for other front-end frameworks too.
The rest of the blog will give detailed insights into the installation and configuration of the i18n internationalization library.
About packages to be installed:
The version mentioned against each dependency is the version listed in my package.json at the time of the project set-up.
- i18next(ver: 19.8.3)
It is a framework for internationalization and comes with easy integration for commonly used front-end frameworks like React, Vue.js, Angular. - i18next-browser-languagedetector (ver: 6.0.1)
i18n provides full support for localization and offers this plugin for user language detection in browsers. It extends its support for storing the user’s locale in cookies, localstorage, session storage. eg:- cookie (set cookie i18next=LANGUAGE)
- sessionStorage (set key i18nextLng=LANGUAGE)
- localStorage (set key i18nextLng=LANGUAGE)
- react-i18next (ver: 11.7.3)
It is an internationalization framework based on i18next and comes with extended support for React. - i18next-xhr-backend (ver: 3.2.2)
It dynamically loads the translation from the specified locale module containing the translated content.
Installing and configuring the dependencies:
For better clarity of each step, I will be explaining the localization setup using the boilerplate react app.
If you have already got your project setup, skip this step and Hold down for a moment and think, which content does your app serve and needs to be translated.
You may have noticed a couple of instances mentioned below:
- Static text
- Static content with some dynamic number(count) enclosed in a template literal
- Create a project from the terminal using npx with create-react-app
npx create-react-app localisation-i18n
- Install the dependencies listed above by running the following command from your terminal
yarn add i18next react-i18next
yarn add i18next-browser-languagedetector
yarn add i18next-xhr-backend
- Added some content in src/App.js for translation.
To keep the focus on translation setup I have used inline styles for basic styling. - Adding the translated files along with resource bundle in src/locales
- Create a folder named locales in src of the project.
- Create a subfolder inside locales named “<key>” (en, jap) for every translation language
- Create translation.json file in each language folder (en, jap) and add symbols in translation.json file for every language as key-value pair
To improve the readability of your code, it’s always advisable to separate the translated
content from the i18n config file (src/i18n.js).
For the sake of modularising your code, you can also create a folder named locales inside each container of your project and add respective translations.
eg:
src/locales/en/translation.json
{
   "introduction": "Localization simply refers to customizing the look and feel of your product, maybe your Mobile or Web App for users of different regions and dialects."
}
src/locales/jap/translation.json
{ "introduction": "ローカリゼーションとは、さまざまな地域や方言のユーザー向けに、製品のルックアンドフィールをカスタマイズすることです。モバイルアプリやWebアプリなどです。" } - Adding configuration file of i18n to load translations
Create a file in src of the project named as i18n.js(src/i18n.js)
I have added a basic configuration you can always customize according to your project needs. You can also refer to https://react.i18next.com/import i18n from "i18next"; import LanguageDetector from "i18next-browser-languagedetector"; import XHR from "i18next-xhr-backend"; import translationEng from "./locales/en/translation.json"; import translationJap from "./locales/jap/translation.json"; i18n .use(XHR) .use(LanguageDetector) .init({ debug: true, lng: "en", fallbackLng: "en", keySeparator: false, interpolation: { escapeValue: false }, resources: { en: { translations: translationEng }, jap: { translations: translationJap } }, ns: ["translations"], defaultNS: "translations" }); export default i18n; - Add below imports in src/index.js
import { I18nextProvider } from "react-i18next";
import i18n from "./i18n";
Pass i18n as a prop to the i18nextProvider component, which wraps the whole App.
- Implementing localization by HOC ApproachAdd the following import to your src/App.js file
import { withTranslation, Trans} from 'react-i18next'Wrap App component in withTranslation HOC.
Pass the additional react-i18next function t as props to App Component.
The render method at this stage may appear as if this:
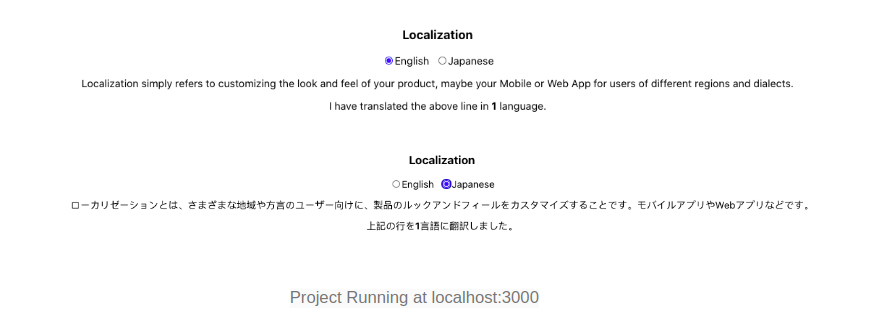
render(){ const {t, i18n} = this.props return ( <> <div style={{textAlign : 'center'}}> <h3>{'Localization'}</h3> <p> {t('introduction')} </p> </div> </> ); } - Now, It is up to you to select and design any UI layout of your choice for changing language. Here, to keep the focus on translation setup I will add a basic radio buttons layout for changing language.

- Interpolation using i18n.js
I mentioned above one common scenario you would encounter while translating your app content:
eg: I have translated the above line into 1 language. Here, 1 is a dynamic count. To translate the above line Trans from ‘react-i18next’ comes to the rescue.
It is useful when static content contains some dynamic value and needs to be formatted at the time of translation. Add this in src/locales/en/translation.json{ "subtext": "<p>I have translated the above line in <strong>{{count}}</strong> language.</p> }src/locales/jap/translation.json
{
 "subtext": "<p>上記の行を<strong>{{count}}</strong>言語に翻訳しました。</ p>
}
Conclusion
i18n and react-i18next offer plenty of features like interpolation, formatting to translate our app content. Also, its integration with React is pretty simple.
The full source code for this blog is available at:


