Why AWS key Management?
As you know we can create multiple EC2 (AMI) in VPC (Virtual Private Cloud) and create load balancer to route the traffic.
There is an application installed on EC2 from where we can create a multiple AMI under VPC and using load balancer we can distribute or route the traffic on the instances. In such a case, when multiple developers are there it is very risky to allow all developers/users to access the instances with admin PEM file.
Here comes the IDEA of AWS KEY MANAGEMENT.
One short answer is that create separate PEM for all the users.
How:
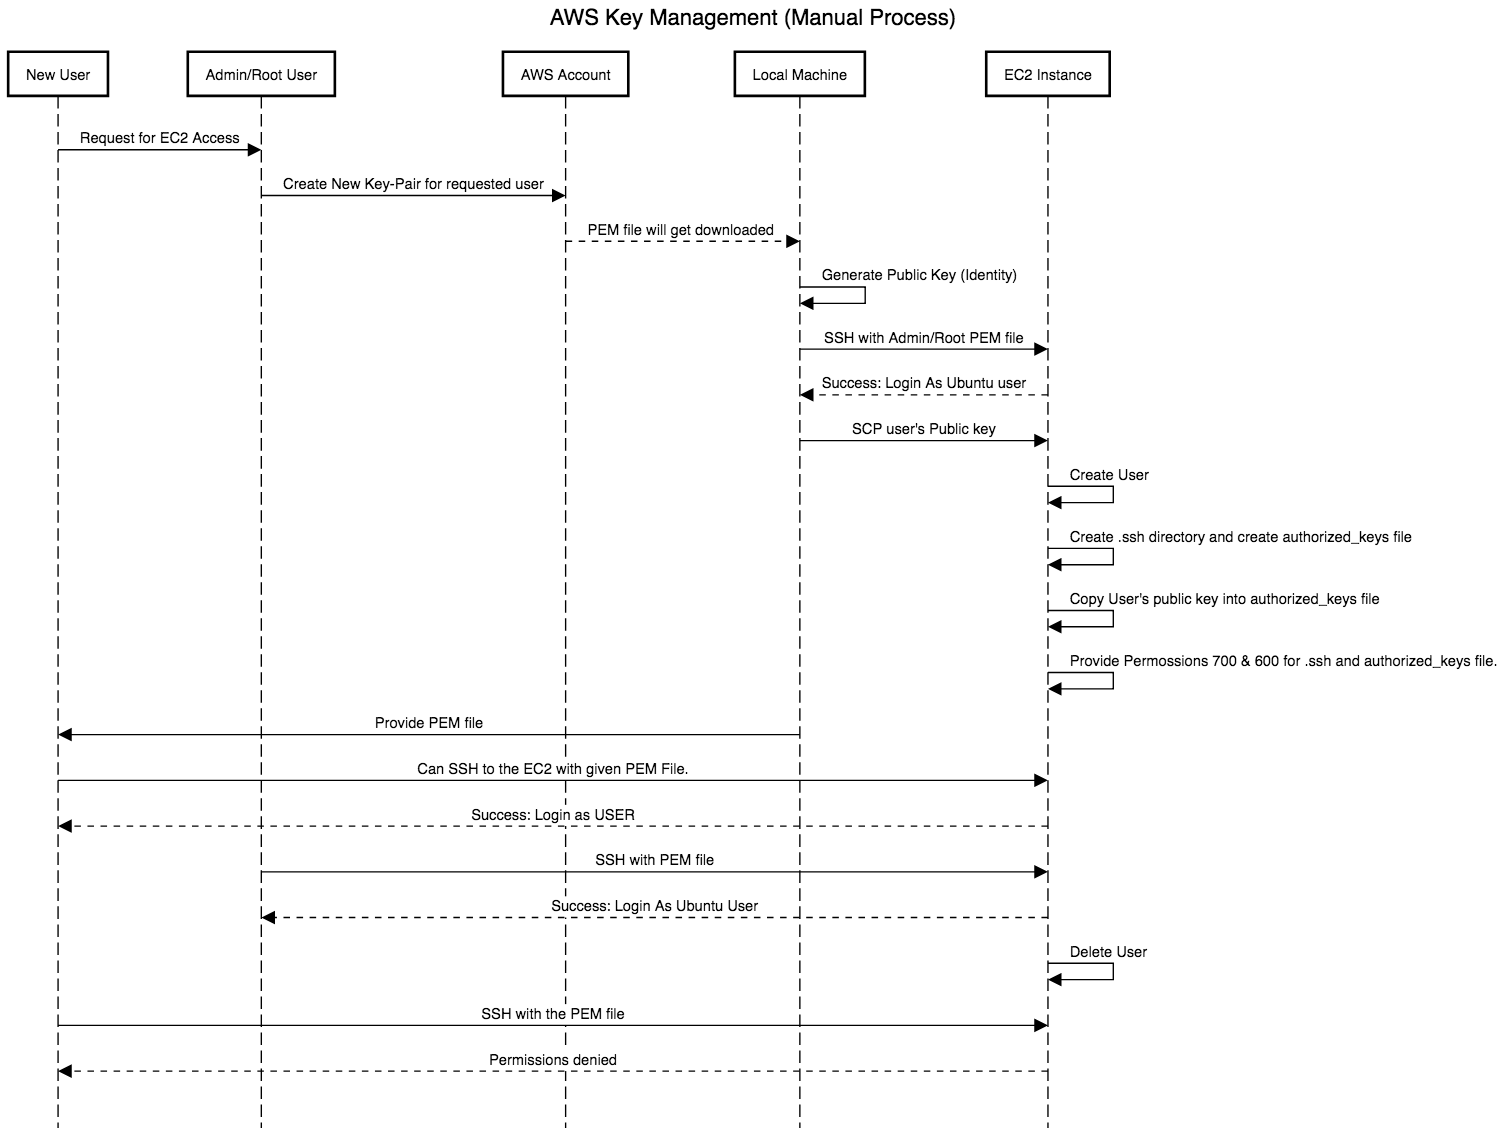
- AWS root user needs to create a Key-Pair for the particular user.
- AWS root user has his root PEM file by which admin can “SSH” into the server with root access.
ssh -i “root-access.pem” ubuntu@ec2-52-14-18-23.us-east-2.compute.amazonaws.com

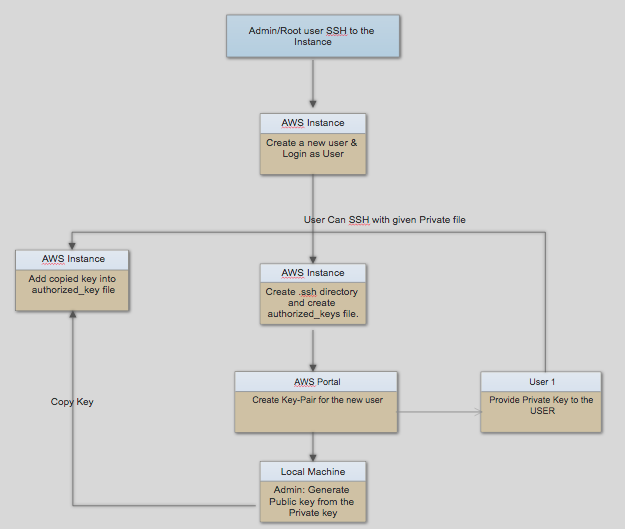
Fig. Shows overall AWS KEY MANAGEMENT process.
- Admin will create a new user into EC2 machine with the particular username to identify the user to whom we are allowing access to this server.
sudo adduser myusername
- This will create a new account with the name “myusername” in the EC2 instance.
- Switch to created user account to add public key so that user can SSH to the EC2 instance.
sudo su – myusername
- Create a directory in root.
cd ~
mkdir .ssh
Add permissions: chmod 700 .ssh
cd .ssh
touch authorized_keys
Add permissions: chmod 600 authorized_keys
- Generate a public key for the user from the private key-pair (username.pem) that admin already has created in AWS account .
- Add permissions: chmod 400 username.pem
ssh-keygen -y
- This will ask following input
Enter file in which the key is (/Users/tudip/.ssh/id_rsa): <path-of-username.pem>
- This will provide you private key.
- Copy that key and add into authorized_keys file in EC2 instance that we have already created.
- Provide private key to the user to whom we are providing access to the server.
- So that by following command user can ssh to the EC2 server.
ssh -i “username.pem” username@ec2-52-14-18-23.us-east-2.compute.amazonaws.com
- For deleting user, admin needs to just execute following command to delete the user.
sudo deluser username
Note:
- chmod-400 file: To protect a file against accidental overwriting.
- chmod-600 file: A private file only changeable by the user who entered this command.
- chmod-700 file: Protects a file against any access from other users, while the issuing user still has full access.
AWS COPY KEY
- For new AWS instance, admin already has “Private key” (PEM) file to SSH to the server.
- Copy this “Private key” (PEM) file to our old existing EC2 instance.
scp -i test-access.pem <test-access-new.pem> ubuntu@old-existing-ec2-instance:~/
- SSH to the old-existing-ec2-instance from where admin wants to copy all the allowed users to the new instance so that existing users can SSH to the new server.
ssh -i test-access.pem ubuntu@old-existing-ec2-instance
- Move to the “/home” directory from where admin can see all the existing users.
cd /home
ls -al
- Move to the folder where “Private key” (PEM) file is stored.
cd ~
- Execute following command. This command will copy all the users from current EC2 instance to the new instance.
rsync av -e “ssh -i <new-ec2-pem-file>” –exclude=’ubuntu’ /home/ ubuntu@<new-ec2-instance>:/home/
- SSH to the new EC2 instance to verify if all the users are copied successfully.
ssh -i <new-ec2-pem-file> ubuntu@<new-ec2-instance>
- Now admin needs to provide ownership of the user to the particular user folder.
sudo chown -R <user> <directory>
- Done! Now users from the <old-ec2-instance> will be able to access <new-ec2-instance> with already provided “Private key” (PEM) file.
How to allow ownership of multiple users to the directory:
- You can create a group
- Add Users to the group
- Allow chown permissions with the group instead of users as stated above.


