An Introduction to a WordPress Multisite
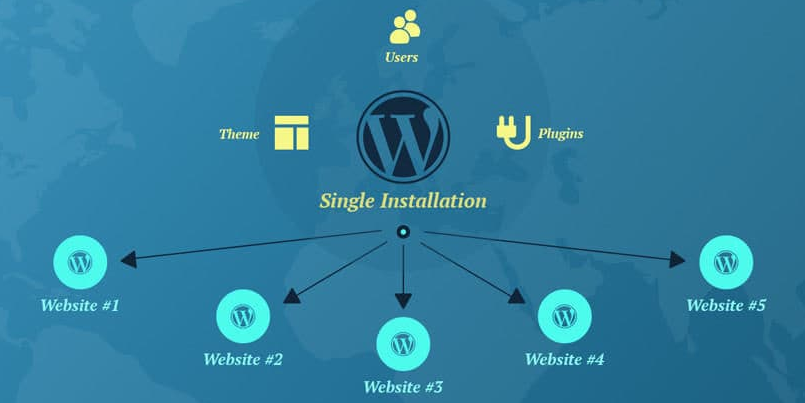
WordPress 3.0 comes with a feature of Multisite, which allows the user to create a “Network” of subsites within a single install of WordPress. Thus by installing WordPress just once on your server, you can run as many sites as you want.
The multisite feature enables you to create new sites instantly and manage them using the same username and password. We can even allow other users to signup and create their own blogs on your domain. The great thing about the Multisite feature is that the WordPress installation is the same as the standard WordPress installation: it has the same folder structure, the same core files, and the same code base.
Updating the WordPress Multisite is exactly the same as updating any WordPress site. All the network’s themes and plugins are stored just once, no matter how many times we use them, which means a very less server space will be used as compared to individual installation.
Pros of using a WordPress Multisite
- We can manage multiple sites from a single dashboard.
- Each site on the network can have its own admin, the site admin can manage the capabilities of their own site.
- We can install and activate themes and plugins on multiple sites with a single download.
Cons of using a WordPress Multisite
- All the sites on the network share the same resources, thus if the network is down, all the sites go down as well.
- If one site gets hacked, then all the sites on the network get hacked.
- Management of traffic and server resources is not easy for beginner level users.
Steps for How to install and set up a WordPress Multisite:
- Requirements for a WordPress Multisite Network
- Domain Structure for the Multisite Network
- Setting up a WordPress Multisite Feature
- Setting up the WordPress Multisite Network
- Adding Themes and Plugins to Your Multisite Network
- Installing plugins for your Multisite network
- Troubleshooting the WordPress Multisite Issues
In this video, we will show you how to install and setup a WordPress Multisite Network.
In this article, we will show you how to properly install and setup a WordPress Multisite Network.
Requirements for a WordPress Multisite Network
The websites on a WordPress multisite network share the same server resources, thus the most important thing we will need is a good WordPress hosting. Apart from web hosting, we will need basic knowledge of how to install WordPress and file editing.
Domain Structure for the Multisite Network
On a WordPress multisite network, we can add new sites using either subdomains or sub-directories.
Example of the subdomain:
http://mysite.example.com
Example of sub-directory:
http://example.com/mysite/
If we choose subdomains, then we will have to configure the wildcard subdomains on the server. On the other hand, if we choose the sub-directories or path based URLs for the site, then the only thing we need to do is enable the pretty permalinks on the root site.
For the wildcard domains, we need to login to the WordPress hosting account cPanel and scroll to the domains section and click on subdomains. On the next page enter the subdomain where you want to host the website.
Setting up a WordPress Multisite Feature
The multisite feature is a built-in feature of WordPress that comes with every WordPress installation. All we need to do is to install and set up WordPress like we normally do. After that, we just need to enable the multisite feature.
We need to add the following code in the wp-config.php file just before the
/* That’s all, stop editing! Happy blogging. */ line.
/* Multisite */
define( 'WP_ALLOW_MULTISITE', true );
Once done, just save the file on the server. This code enables the multisite feature. However, we still need to set up the multisite network.
Setting up the WordPress Multisite Network
Now that the Multisite feature is enabled on the WordPress website, it’s time to set up the multisite network.
For an existing WordPress website if we want to enable the WordPress Multisite network then firstly we will need to deactivate all the plugins.
Just visit the Plugins -> Installed Plugins page and select all plugins. Select the ‘Deactivate’ option from the ‘Bulk Actions’ dropdown menu and then click on the ‘Apply’ button.
Now head over to the Tools -> Network Setup page to configure the Multisite Network.
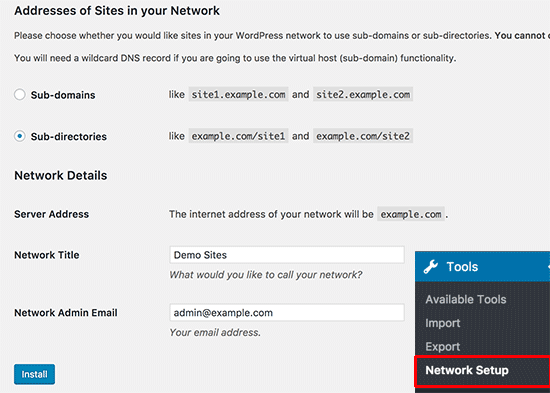
On the network setup screen, you can see a notice that you need the Apache’s mod_rewrite module to be installed on the server. Mostly this module is installed and enabled on all the best WordPress hosting providers.
Next, you need to tell WordPress what kind of domain structure you will be used for sites in your network, e.g. Subdomains or Sub-directories.
After that, provide a title for the network and make sure that the email address in the Network admin email is correct.
Click on the install button to continue further.
WordPress will show some code that needs to be added to the wp-config.php and .htaccess file respectively.
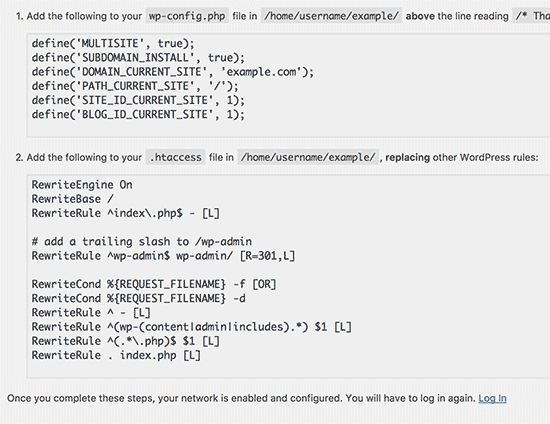
Now you will need to re-login to your WordPress site to access the multisite network.
Configuring the Network Settings
It’s time to configure the Network Setting. Follow the below steps:
- Switch to the Network Dashboard (WordPress Admin Panel)
- Select My Sites -> Network Admin -> Dashboard
- Configure the menu items.
- You can see the “Right Now” dashboard widget that allows you to create a new site and also to add new users.

Adding Themes and Plugins to Your Multisite Network
To add new themes, go to My Sites » Network Admin » Themes page.
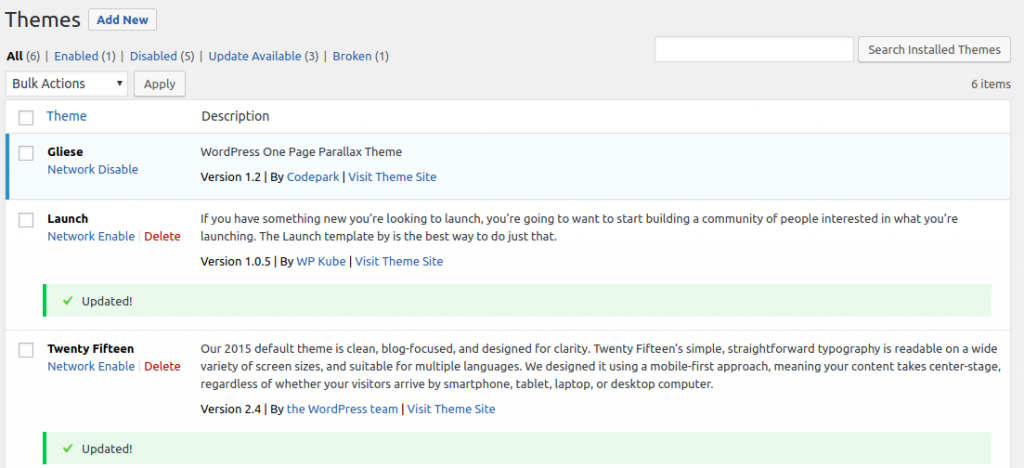
Here on this page, you can see the list of the currently installed themes on the WordPress multisite. We can make the theme available for other sites by clicking Network Enable option under that theme. You can disable the theme by clicking on the Network Disable option.
Installing plugins for your Multisite network
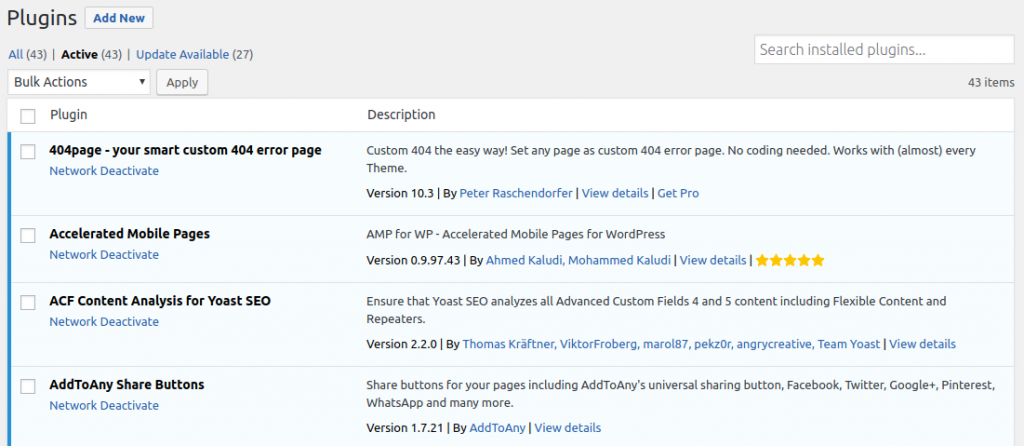
Just like Themes, you can visit My Sites » Network Admin » Plugins page to install plugins and click on the ‘Network Activate’ option below each plugin to activate them on your multisite network.
Troubleshooting the WordPress Multisite Issues
Most of the issues in the WordPress Multisite Network occur due to the incorrect configuration of the wildcards domains, make sure your web host supports the wildcard subdomains.
Another issue is with the sub-directories, some users are unable to login to the admin area of the website after adding the required code in the wp-config.php file.
To fix this issue, try replacing a line in the wp-config.php file with
define('SUBDOMAIN_INSTALL', 'false');
Conclusion
Hope this article was helpful for you to learn how to install and setup WordPress multisite network. If you have found this article helpful and worthy then do share it with your friends and colleagues too. And here you will get some WordPress tips and tricks which will help you in the Future!
Happy Blogging!


