03 March 2021
What is Stripe?
Stripe, a service provider based in San Francisco, California, United States, is an American financial services and software company. The business mainly provides e-commerce websites and mobile apps with payment processing tools and application programming interfaces.
Advantage of Stripe
- Flat-rate charges, competitive with top options
- No extra fees for setup, cancellation, management of the account, etc.
- You can quickly and conveniently sign up for an account online.
- Highly flexible with many choices for incorporation
- Best for payments made globally
Getting Publishable Key and Secret Key from Stripe Dashboard
- We’re going to build an account with Stripe. You can skip this stage and proceed to the Get Your Stripe API Key portion if you already have a Stripe account that you wish to use with HostLaunch.
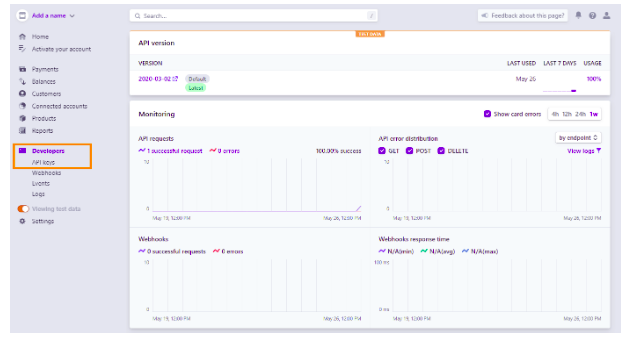
- Select Settings, and then select the API keys on the Stripe dashboard sidebar.

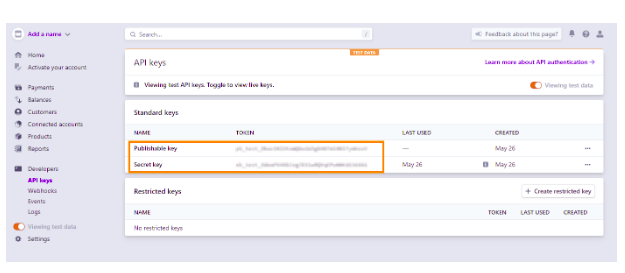
- Find the Publishable Key and Hidden Key fields on the API Keys page and copy their values.

Implementation
- The first move is to add the Stripe gem to your Gemfile application.

- Then to instal the gem, run bundle instal.
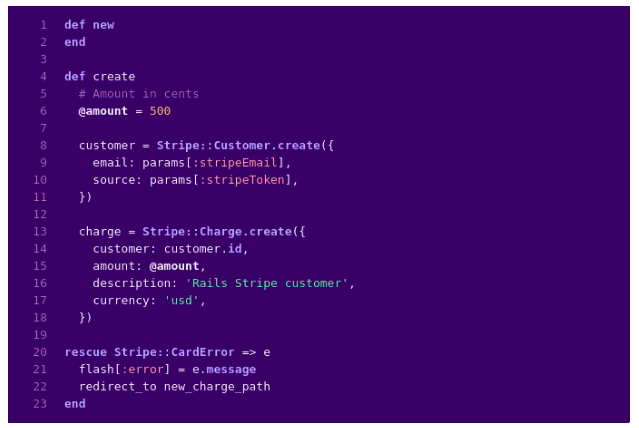
- Next, create a new Controller of Charges:

- Two things the controller does are:
- Displays a form with a credit card (using Checkout).
- The actual charges are generated by calling our API

- The code uses two POST parameters to create a Customer Object first. You can directly produce a fee, but first having a customer enables repeat billing. The source property is set to the parameter stripeToken, which represents the given payment process. The token is generated by Checkout automatically.
- Stripe requires amounts to be in cents; since $5 is the charge, 500 is allocated to the sum parameter. An optional description parameter is often used by A Fee, which can be something important to you. In the charge request, the customer ID is given, meaning the payment method previously stored will be charged.
- For a variety of reasons, such payment attempts fail, such as an invalid CVC, bad card number, or general decline. Any Stripe::CardError exception will be caught and stored in the flash hash.
- In order for users to navigate the newly developed controller, configuration/routes.rb adds a path to it.

- The programme uses your hidden and publishable API keys to communicate with Stripe. An initializer, which will be given when the application is started, is a good place to set these values.
- For config/initializers/stripe.rb, add the following:

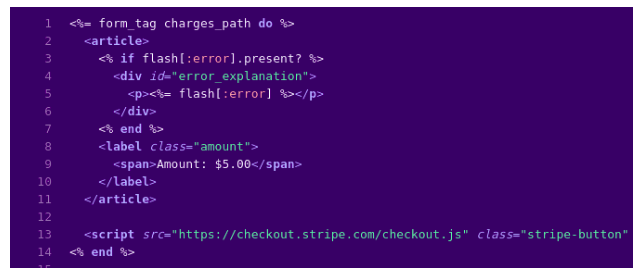
- Now under app/views/charges, which is the checkout tab, create new.html.erb. Note that Checkout is used for the tab. Checkout shows a form of credit card overlay, conducts fundamental validation, and reports inline errors.
- There is also a place for the form to report any server side errors that might occur.

- Finally, under app/views/charges, build a create.html.erb view that gives users a message of success:

- Start the Rails server to test the integration, making sure you set the environmental variables to your publishable and secret keys. Using the test keys for now rather than your live ones:

- In the code, we put random API keys. To test this code for yourself, replace these with your real API keys.
- Navigate to http:/localhost:3000/charges/new now to see the ready to use payment type. You can try the method with any dummy data if you’re using test API keys. Enter the number of the special credit card 4242 4242 4242 4242, the three-digit CVC, and any potential expiry date. Submitting the form should pull up the page of the active fee, and in the Dashboard you can see the charge.


