06 January 2021
Prerequisite
- Laravel 7.2 or Higher
- Composer
- Postman or Talend API Tester or any API testing Tool
Laravel Sanctum
Laravel Sanctum was introduced in the Laravel 7.x version. This feature provides us a simple authentication framework for SPA (Single Page Application). Using Sanctum we can produce various for a user and these tokens may be conceded with various scopes. For eg., post:create scope, etc using this scope we can permit the user to perform an action.
In this blog, we will create a Laravel Project, set some APIs, and authenticate these APIs using Laravel Sanctum
Creating A Project:
You can install Laravel by using the Composer create-project command in the terminal:
laravel new sanctum
or
composer create-project --prefer-dist laravel/laravel:^7.0 sanctum
Further, you can see this link to install Laravel.
Setting Up Laravel Sanctum:
Install Sanctum:
Install Laravel Sanctum via Composer. Execute the below command in terminal
composer require laravel/sanctum
Publish Files:
Use vendor:publish Artisan command to publish the Sanctum configuration and migration files. The sanctum configuration file will be placed in your config directory and migration files will be placed with your database directory inside the migration folder
php artisan vendor:publish --provider="Laravel\Sanctum\SanctumServiceProvider"
Database Migrations:
Run your database migrations, this will create one database table for storing API tokens
php artisan migrate
Set Middleware:
Edit your app/Http/Kernel.php file to add Sanctum’s middleware into your API middleware group.
 'api' => [

    \Laravel\Sanctum\Http\Middleware\EnsureFrontendRequestsAreStateful::class, //Add this line in api middleware group

    'throttle:60,1',

    \Illuminate\Routing\Middleware\SubstituteBindings::class,

     ],
Issue Personal Access Token:
Use HasApiTokens trait in the User Model for issuing token to the users
use Laravel\Sanctum\HasApiTokens;

...

class User extends Authenticatable

{

    use HasApiTokens, Notifiable;

    ...

}
Create a User Table Seeder:
Seeders are used for seeding your database with test data using seed classes. Seed classes are present in the database/seeds directory.
Create User Factory:
By default, Laravel provides a Factory for User Model in the database/factories directory. But if the factory is not available then you can create it by
php artisan make:factory UserFactory --model=User
Added Below code to add in the Factory Class
use App\User;

use Faker\Generator as Faker;

use Illuminate\Support\Str;

$factory->define(User::class, function (Faker $faker) {

    return [

        'name' => $faker->name,

        'email' => $faker->unique()->safeEmail,

        'email_verified_at' => now(),

‘password' => '$2y$10$92IXUNpkjO0rOQ5byMi.Ye4oKoEa3Ro9llC/.og/at2.uheWG/igi', // password

        'remember_token' => Str::random(10),

    ];

});
Create Seeder for Users:
To populate dummy user create the seeder class for the User model
php artisan make:seeder UserTableSeeder
Insert dummy users:
Open database/seeds/UserTableSeeder.php and add the below code:
use Illuminate\Database\Seeder;

use App\User;


class UserTableSeeder extends Seeder

{

    public function run()

    {

        factory(User::class, 20)->create();

    }

}
Populate the user table:
Populate the user table by running the following:
php artisan db:seed --class=UserTableSeeder
Note: This Command will create 20 dummy users in the User table.
Create An Authentication Controller:
For adding the login feature, we will need to create an Authentication Controller where our login function will be present
Create Controller:
Execute the below command to create an authentication controller
php artisan make:controller AuthController
Add Login Method:
Open the AuthController and create a login method inside it. Copy below code into it
public function login(Request $request)

{

  try {

    $credentials['email'] = $request->input('email');

    $credentials['password'] = $request->input('password');

    if (!Auth::attempt($credentials)) {

      return response()->json([

        'status' => 401,

        'message' => 'Unauthorized'

      ]);

    }

    $user = User::where('email', $credentials['email'])->first();

    if ( !Hash::check($credentials['password'], $user->password, [])) {

       throw new \Exception('Exception in login');

    }

    $tokenResult = $user->createToken('authToken')->plainTextToken;

    return response()->json([

      'status' => 200,

      'access_token' => $tokenResult,

      'token_type' => 'Bearer',

    ]);

  } catch (\Exception $error) {

    return response()->json([

      'status' => 500,

      'message' => 'Exception in Login',

      'error' => $error,

    ]);

  }

}
Creating Form Request:
Create a form request:
To validate email and password for login method create a form request by using the below command:
php artisan make:request LoginUser
Add Validation rules:
Copy below in the LoginUser.php file and replace the rules method
    public function rules()

    {

        return [

            'email' => 'email|required',

            'password' => 'required'

        ];

    }
Update AuthController:
Update login method of AuthController.php to accept the LoginUser Object as parameter
public function login(LoginUser $request) //Replace Request class with LoginUser Class

{

   ...

}

Note:- Make sure to import the LoginUser Class in the AuthController
Define Routes:
As we are creating API so we can define our routes in routes/api.php file
Route::post('/login', 'AuthController@login');

Route::middleware(['auth:sanctum'])->group(function () {

  Route::get('/posts’, 'PostController@index');

});
As you can see, we have added the login route outside the middleware as the login route does not require an authorization header. The routes that require authentication, add them inside the middleware group.
By defining the routes inside the middleware group, the API will require an Authorization header (Authorization = Bearer {Personal Access Token}) to perform the action. APIs will return an Unauthorized status code if the token isn’t sent in the headers.
Start Laravel Server:
After completing the above changes, you will need to serve the laravel project. So that to serve the project execute the below command:
php artisan serve
This command will expose the APIs on http://127.0.0.1:8000. You can make an API request using this base URL.
Hit Login API:
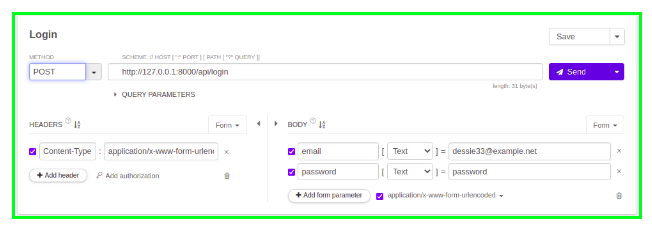
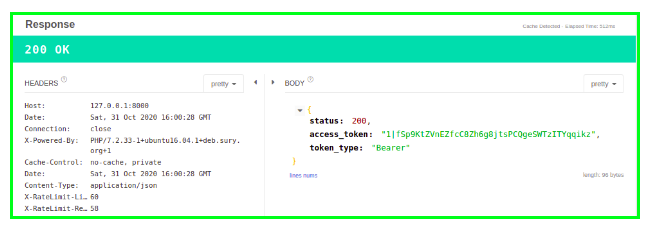
Execute the login API, which will provide the Personal Access token and token type for a user. You can use Postman or Talend API Tester Chrome Extension to hit the API.


Similarly, you can create a setup for Posts and create an API to fetch all the posts. Specify the route in the sanctum middleware. Now, you will need to pass the Authorization Header for accessing the API for Posts.
And That’s it, you have successfully implemented Laravel Sanctum in your application.


