25 September 2020
What is NgRx?
NgRx is an angular framework to build reactive applications built on top of rxjs. It gives state management to create applications that can be explicitly maintained. So basically it will maintain the data or the state in-store and from that via service or directly we can access it in our component.
Steps to install NgRx:
- Step 1: Check for angular cli by ‘ng -v’ in the terminal.
- Step 2: Create a workspace for the project.
- ng new ngrx-tutorial
- Step 3: Get into the workspace and install NgRx package manager.
- Installing with npm.
- npm install @ngrx/store –save
- Installing with yarn.
- yarn add @ngrx/store
- Installing with ng add.
- ng add @ngrx/store
- Installing with npm.
Create a Model:
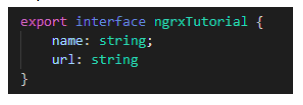
Model is something that is specific to NgRx in which we can export the interface.
Steps:
- Create a folder inside the src folder.
- Create a model.ts file inside that folder and add the code from the snapshot in the .ts file.

Create an Action:
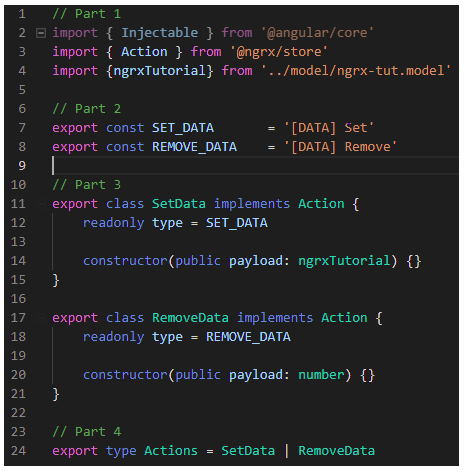
Action in NgRx store defines two things:
- It’s type in a string basically defining what’s happening there. For eg. remove_tutorial or add_tutorial.
- It states the payload of the required data.
Steps:
- Create a folder inside the src folder.
- Create an actions.ts file inside that folder and add the code from the snapshot in the .ts file.

- Part 1: Import action from NgRx store and the model (ngrx Tutorial in our case).
- Part 2: Define the action type in a string constant.
- Part 3: To pass the data in the payload create a class for each action with the constructor.
- Part 4: Export all the action classes to use in the reducer.
Create a Reducer:
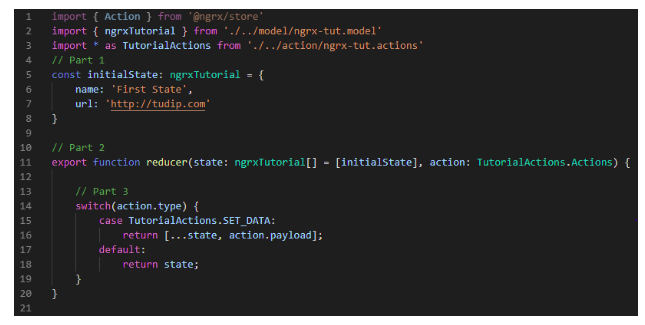
The reducer takes the incoming actions and checks what to process with them. It returns a new state and accepts the previous state depends on the action
Steps:
- Create a folder for reducer inside src.
- Create a reducer.ts file inside that folder and add the code from the snapshot in the .ts file.
 This is how it works:
- Part 1: Created some initial states with some sort of data.
- Part 2: It is the actual reducer. It takes the initial state we have defined ‘ngrx Tutorial’ for our case and we will need to pass the action we have imported.
- Part 3: We used a switch case to determine the action type that is accessed so when we initially call this reducer and the project loads up, by default it is going to return the state until the action type will be accessed through the dispatch mask method.
Create an App state:
This is the last part we need to do that is to define the app state.
Steps:
- Create a file inside the app folder as app.state.ts
 Import this file in the components in which ngrx will be accessed.


