The Implementation of Nested Forms in Ruby On Rails (Fields For)
The Implementation of Nested Forms in Ruby On Rails (Fields For)
Form helpers are designed to make it much easier to work with resources. A form to create or update a resource typically reflects the resource’s identity in several ways:
- The URL that the form is sent to should result in a request being routed to the appropriate controller action.
- Input fields should be named in such a way that in the controller their values appear in the appropriate places within the parameter’s hash.
- For an existing record, input fields corresponding to resource attributes should display the current values of those attributes when the form is initially displayed.
What is nesting of forms in Ruby On Rails?
Rails provide a powerful mechanism for creating rich forms called ‘nested attributes’ easily. This enables more than one model to be combined in forms while maintaining the same basic code pattern with simple single model form. Nested attributes allow attributes to be saved through the parent on associated records. The updating of the nested attribute is turned off by default and can be enabled using the class method ‘accepts_nested_attributes_for’.
It creates a scope around a specific model object like ‘form_for’ , but doesn’t create the form tags themselves. This makes ‘fields_for’ suitable for specifying additional model objects in the same form. Although the usage and purpose of ‘field_for’ is similar to ‘form_for’, its method signature is slightly different. Like ‘form_for’ , it yields a FormBuilder object associated with a particular model object to a block, and within the block allows methods to be called on the builder to generate fields associated with the model object.
Implementation
1. One to One relationship :
The ‘has_one’ and ‘belongs_to’ associations sets up a one-to-one connection with another model, such that each instance of a model contains or possesses one instance of another model and each instance of the declaring model ‘belongs to’ one instance of the other model.
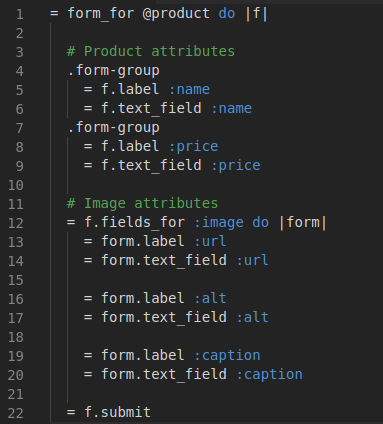
Nested Attributes’s simplest example is a one-to-one association. The example below is how to make an online store with lots of products. Each product have one image and each image has the attributes such as url, alt, and caption. Hashes with integer keys are treated differently, and as if they were direct children, you can declare the attributes. If you use ‘accept_nested_attributes_for’ in combination with a ‘has_many’ association, you get these kinds of parameters.


Also, each Product is associated with one Image record, which contains an url, alt, and a caption.


What does this do, exactly?
It would proxy the Product model’s saved attributes to the Image model. You will need to add additional fields to the image association in the Product form. You can do it by using the ‘fields_for’ helper.


Now, the only remaining part is to modify the controller to accept those new attributes. The whole idea behind Nested Attributes is that you don’t need to add additional code to the controller to handle this input and association, but you need to allow those attributes to reach the model, which is what Strong Parameters would by default prevent. So, you’ll need to add the following to the ‘product_params’ method in the Products Controller.


2. One to Many relationship:
Now in many to many relationship we will take the same example for Product and Images but modifying it a little bit. Here we will consider that one Product may have one or more images. Product images are quite simple (just two fields), so it really doesn’t make sense to create a separate page to edit them. Instead, together with the product attributes, we would like to edit them in-line from the same product form. And since each product can have a lot of images, we will have to handle more than one item. We need to add new images and delete old ones as well. Let’s tackle one by one the problems. Following will be the modifications in Product model to have multiple images for the Product, ‘has_one’ association for images will be replaced with ‘has_many’ association.
class Product < ActiveRecord::Base
has_many :images
accepts_nested_attributes_for :images
end
Displaying multiple associations
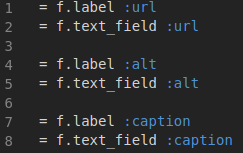
The ‘fields_for’ method yields a block for each associated record, so we don’t need to change anything – but because we need to reuse this form (to automatically add new fields through JavaScript) we need to move it into a separate file. We will create a new partial, called ‘_image_fields.html.haml’ that contains just the fields of images like this:
And back in the product form, we will just take advantage of the fact that ‘fields_for’ yields a block for each association to render the fields, and we will pass the form helper object to the partial object like this:


= f.fields_for :images do |f|
= render 'image_fields', f: f
Adding new associations
We will need to create some JavaScript that adds new fields to add new associations. We will have a link to add a new tuple of fields when clicked. Something this way:
= link_to_add_fields 'Add Product Images', f, :images
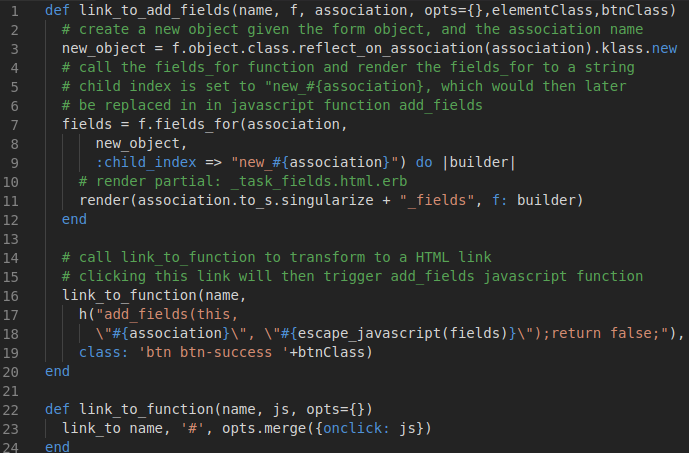
This is a useful helper method for creating a link with the button that contains all the partial ‘ image fields.html.haml ‘ content. The idea here is to use some simple reusable JavaScript to add those fields to the end of the form when you click on it. This helper looks pretty complex and messy, but it’s as simple as most code. It only handles the arguments and the logic of the key. This code can be placed in your ‘application helper.rb’ .


Using the Model Associations, I used a javascript function to add new fields to the form. Here we generate the new unique ‘id’ for the new field first and attach it to the end of the form.
function addfields(link, association, content) {
var newid = new Date().getTime();
var regexp = new RegExp("new" + association, "g");
$(link).parent().before(content.replace(regexp, newid));
}
Now clicking on the ‘ Add Product Images ‘ will add the new image model fields in the same form for the Product Model.
Deleting Associations
If you want to destroy any of the associated models through the form, use the ‘:allow destroy ‘ option for ‘accepts nested attributes for’ first to enable it. This will allow you to specify which models to destroy in the hash attributes by adding a form element for the parameter ‘ destroy ‘ with a value to ‘ true’. The associated records are protected against destruction by default. If you want to have any of the associated records destroyed through the hash attributes, you must first have the option ‘:allow destroy ‘ enabled. Use the ‘ _destroy’ key to destroy existing records as well.
There are some other supported options available for the ‘accept_nested_attributes_for’, they are as follows:
- ‘:reject_if’: Allows you to specify a Proc or a symbol pointing to a method that checks for a certain hash attribute to build a record. The hash is passed on to the Proc or method supplied, and it should either return true or false. If no ‘:reject’ if is specified, a record will be created for all hashes of the attributes that do not have a value of ‘_destroy’ that is true.
- ‘:limit’: Allows you to specify the maximum number of records associated with the nested attributes that can be processed. Limit can also be specified as a Proc or as a symbol pointing to a method of returning a number. If the size of the nested attributes array exceeds the specified limit, the exception is raised for ‘NestedAttributes::TooManyRecords’. If omitted, it is possible to process any number of associations. Note that only one-to-many associations can use the ‘:limit’ option.
For more details: ‘https://apidock.com/rails/ActionView/Helpers/FormHelper/fields_for’


