Step by step Implementation of Routing in Angular
Step by step Implementation of Routing in Angular
20 December 2021
Angular helps to create Single page applications(SPA). In SPA, the page does not reload every time, only the view will change. Let’s get to know how to implement routing in angular.
To handle the navigation from one view to another, we have to use Angular “Router”. The “Router” component is responsible for enabling the navigation in the angular application by considering the URL to change the view.
Prerequisites: Basics of Angular(Component, directives, etc)
Setting up and Loading Routes:
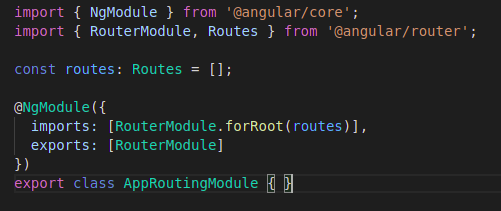
Create a separate routing file for each module eg. modulename-routing.module.ts. You can add routes in the module file also but it would be a good practice to create a separate routing file for each module.
Basic structure of routing-module:
- NgModule: NgModule is a class provided by Angular used to define a module in the application by @NgModule decorator.
- Create a constant variable of type Routes to store the javascript objects, each javascript object specifies the route and the component we want to load for that route.
- Add a few required routes in the routes constant.


- RouterModule: To register routes in our application you have to import RouterModule. RouterModule has a special method called forRoot() which allows you to register routes for the module/application.
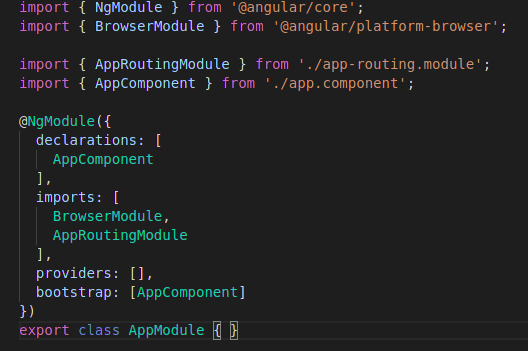
- Now, import this routing module into the main module. For this case, we have to import AppRoutingModule into AppModule.

- To load the component, when Angular detects a particular path in the URL, add <router-outlet> directive in the template of the main module’s component. In this case it is AppComponent.
![]()
![]()
Navigate using routerLink:
For navigation, we have to use routerLink if we want to navigate from a template.
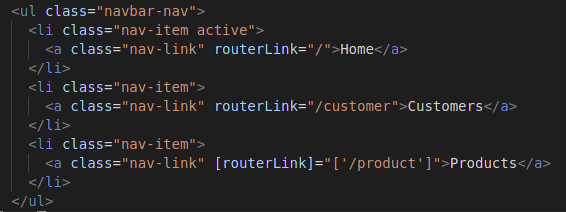

You can either use it by property binding [] or you can directly use it as an attribute.
Add CSS class to active Router Links:
Using routerLinkActive attribute we can add any css class to this attribute which will apply when the current route is active.
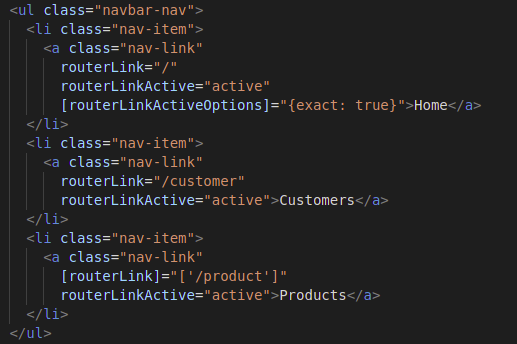

Note: Here we have to add [routerLinkActiveOptions] to be exact true. Because the empty path “/” will always be true when we navigate to other routes and if we don’t use [routerLinkActiveOptions] to be exactly true then the css class of routerLinkActive will be assigned to it every time.
Load a route programmatically
We can use this feature if we want to first perform some operations and then navigate to a route from our typescript code.
![]()
![]()
![]()
![]()


To navigate programmatically we will need an angular router to be imported which is the “Router” class provided by Angular. So that we can tell angular to navigate to a particular route by calling its navigate method.
Add parameters to Routes
We can pass parameters to the route dynamically. For that we have to specify it in the path of the route in the routing module file.
![]()
![]()
![]()
![]()
Fetching Route parameters
Now the point is how to fetch parameters from a route. One of the ways is by using ActivatedRoute’s snapshot.
For this angular provides a class “ActivatedRoute”, by injecting this we get access to the currently loaded route.
![]()
![]()
![]()
![]()
![]()
![]()


In this params array we will get the parameters value which we have defined in the route path. Here we have “id” and “name” defined in the path.
Limitations: The only problem with this approach is that we have to load the same component. Snapshot wouldn’t detect the changes in parameters, if we are loading the same component.
Another way to fetch parameters:
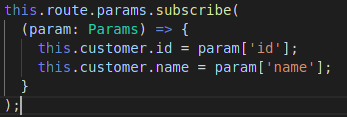
In this method we use params observable of ActivatedRoute to fetch the parameters.
We have to use this way, when we are loading the same component using the route. Params observable will detect the changes and we can use that to get the params.

Passing Query parameters and Fragments
Query parameters are separated by question mark(?) in the URL.
Query parameters will be in key value pairs. Like (?id=4&name=’Ram’)
Fragments will be denoted by # at the end of the URL. Like (#loading)
Pass query parameters and fragment from template:


Pass query parameters and fragment from component:
![]()
![]()
URL would look like:
![]()
![]()
Fetch Query parameters
We will get the Query Parameters in the snapshot of Activated Route.
![]()
![]()
![]()
![]()
![]()
![]()
![]()
![]()
Another way to get query params and fragments if you pass query params and fragments to the same component via route.
![]()
![]()
Set Child Routes:
As our application becomes bigger, components may have child components. So, let’s see how we can set up child routes in the routing module.
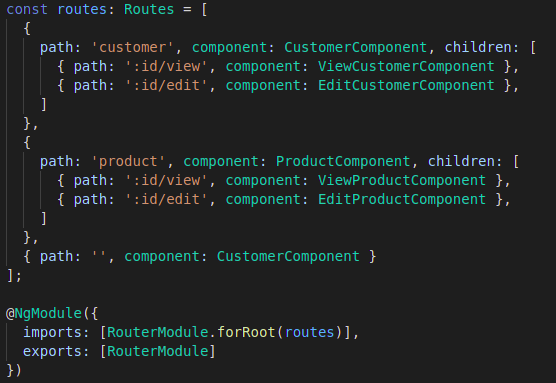

To add child routes, we have to add “children” property to the route object.
<router-outlet> limitations:
<router-outlet> will only serve the top level routes, not for their children route. So to load the child route, we have to add a separate <router-outlet> in the parent component’s template.
Child Route will need a separate outlet in its parent component.
Redirecting and Wildcard routing:
Sometimes users want to access the routes that we don’t have in our application. We must handle it in our application by redirecting it to the “page not found” page or redirect it to the “homepage” of our application.
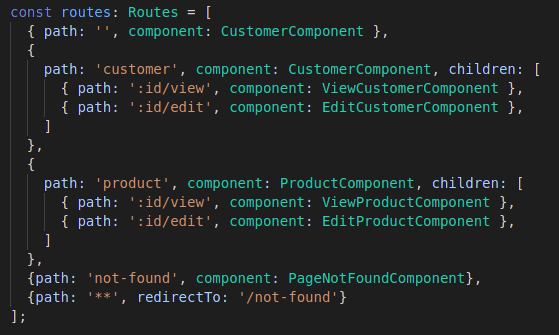
Here, let’s create a Wildcard route and redirect all the not specified routes to the PageNotFound component.
![]()
![]()
Path with “**” is the Wildcard route which covers all the uncovered routes in our application and redirects to “not-found” route.
Note: Order of the routes in the routes array is the most important part. Most generic routes like wildcard should come last in the sequence of routes.

Conclusion:
That’s it, We have covered all the basic concepts in routing like the creation, navigation from template and component, parameters, query parameters, fragment, redirecting and wildcard routes.


