How to integrate Google Authenticator in ASP.Net MVC Project?
How to integrate Google Authenticator in ASP.Net MVC Project?
15 February 2022
What is Google Authenticator?
Google Authenticator is an OpenSource mobile security Application which is based on the two-factor Authentication (2FA). Basically, GoogleAuthenticator is useful to verify the user identity before providing them the access to a certain website or Application. It helps in protecting our accounts against password thefts.
How does it work?
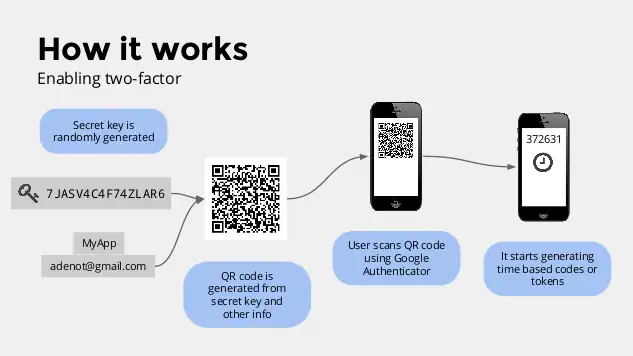
The below image shows how the Google Authenticator actually works using two-factor authentication. While logging in the application, it provides an extra layer of authentication apart from the User Credentials. For login, user is asked to enter the Google Authenticator Code which is generated from its mobile App after scanning the QR Code or manually entering the setup key. The user is granted access of the application only after successful verification.
Steps to implement Google Authenticator:
1: Create A New Project to implement 2-FA
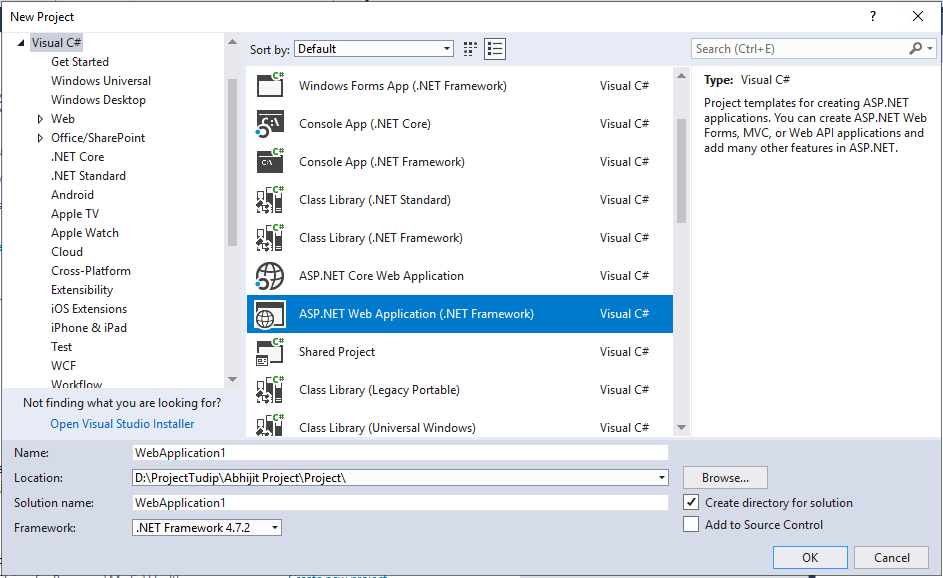
As shown below, we need to create a project of type ASP.NET Web Application. After clicking on the ‘OK’ button, we need to select the ‘Empty’ template and check the MVC checkbox.

2: Add NuGet Package for the Google Authenticator
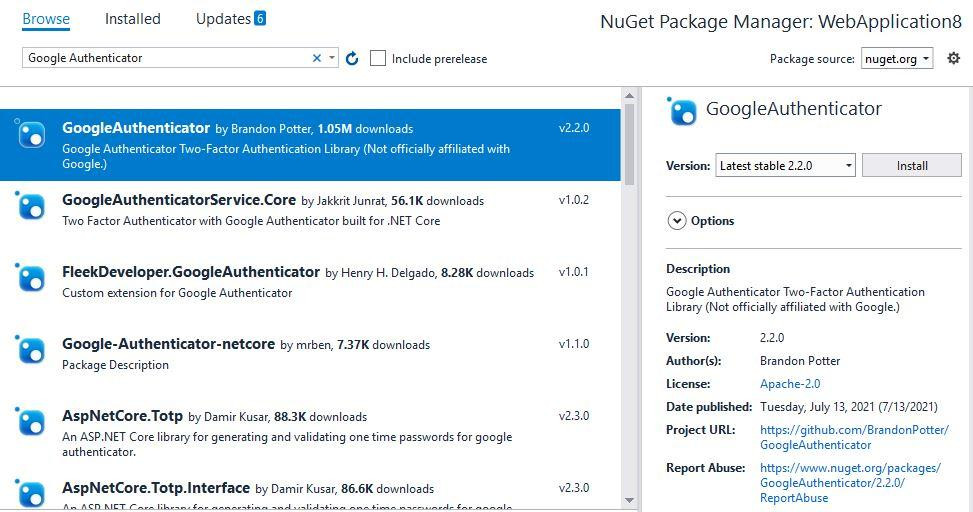
We need to go to the Solution Explorer, Right Click on the References and select the Manage Nuget Packages option. After that, we need to search ‘Google Authenticator’ and install it.

3: Add a new ViewModel (class).
As we can see, we have added a new class “UserLoginModel.cs” in the application. We have created a folder named “ViewModel” for this and added this class file into this folder.
public class UserLoginModel
{

   public string Username { get; set; }//Field to store the UserName

   public string Password { get; set; }//Field to store the PasswordName

}
4: Create a Controller
For creating a MVC Controller, we need to go to Solution Explorer, right click on the ‘Controllers’ folder. Then we need to ‘Add Controller’, select Empty MVC Controller and name it. We are creating a controller named ‘HomeController’.
5: We need to Add a new action method for login
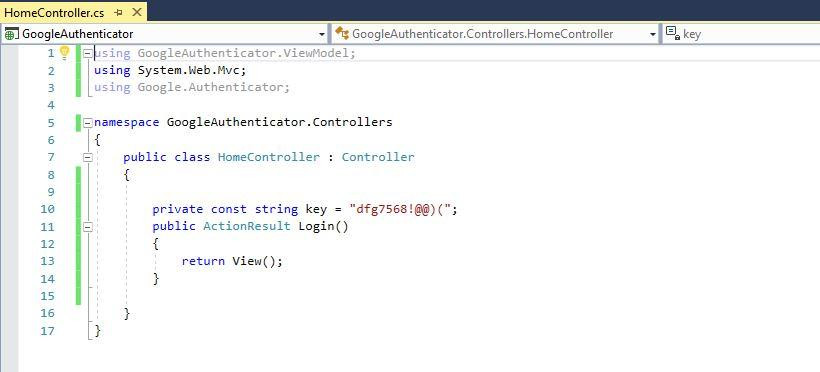
As we can see, we have added “Login” Action to HomeController. After that, we need to write the following code.
private const string key = "dfg756!@@)(*"; //we can use any 10-12 chars

public ActionResult Login()
{
    return View();
}
As We can see in the code below, we have declared a private variable “key”, this key will be used later to generate the Google Authenticator Code.

6: We need to add a view for that login action and design it accordingly.
HTML Code:
           @model GoogleAuthenticator.ViewModel.UserLoginModel
            @{
                   ViewBag.Title = "UserLogin";
             }

              <h2>Login</h2>

               @if (ViewBag.Status == null || !ViewBag.Status)

                {

                      <div>@ViewBag.Message</div>

                            <div>

                                     @using (Html.BeginForm())

                                     {

                                          <div class="form-group">

                                                <label for="Username">Username : </label>

                                                @Html.TextBoxFor(a => a.Username, new { @class =

                      "form-control"})

                                          </div>

                                          <div class="form-group">

                                                <label for="Password">Password : </label>

                                                @Html.TextBoxFor(a => a.Password, new {

                         @class="form-control", type="password"})

                                          </div>

                                          <input type="submit" value="Login" class="btn btn-default" />

                                     }

                               </div>

                       }

                       else{

                               <!--Show 2FA verification form here-->

                               <div>@ViewBag.Message</div>

                               <div> <img src="@ViewBag.BarcodeImageUrl"/> </div>

                               <div> Manual Setup Code : @ViewBag.SetupCode </div>

                               <div>

                                     @using (Html.BeginForm("Verify2FA","Home",

                         FormMethod.Post))

                                     {

                                          <input type="text" name="passcode" />

                                          <input type="submit" class="btn btn-success" />

                                     }

                               </div>

                       }
7: Create another Action(POST) method to verify user credentials using DB.
In this method, firstly we will verify the credentials entered by the user from the database and if the user is found to be valid then and then only, we will generate the QR Code and Google Authenticator code for that user account.
            [HttpPost]

            public ActionResult Login(UserLoginModel login)

            {

                  string message = "";

                  bool status = false;


                   if (login.Username == "Administrator" && login.Password == "Password1")

                   {

                        status = true; //It indicates 2FA form

                        message = "2FA Verification";

                        Session["Username"] = login.Username;


                         //2FA Setup

                         TwoFactorAuthenticator tfa = new TwoFactorAuthenticator();

                          string uniqueKeyforUser = (login.Username + key);

                         Session["UserUniqueKey"] = UserUniqueKey;

                         var setupInfo = tfa.GenerateSetupCode("Dotnet Awesome",

                         login.Username, UserUniqueKey, 300, 300);

                         ViewBag.BarcodeImageUrl = setupInfo.QrCodeSetupImageUrl;

                         ViewBag.SetupCode = setupInfo.ManualEntryKey;

                    }

                    else

                    {

                            message = "Invalid credential";

                    }

                    ViewBag.Message = message;


                    ViewBag.Status = status;

                    return View();

              }
8: We need to create another action method for the users which are authorized successfully and they will be redirected to after successful Authentication.
              public ActionResult MyProfile()
               {
                   if (Session["Username"] == null || Session["IsValidAuthentication"] == null

                         || !(bool)Session["IsValidAuthentication"])

                   {

                        return RedirectToAction("Login");

                   }


                   ViewBag.Message = "Welcome " + Session["Username"].ToString();

                   return View();

             }
9: We need to Add a view for the action (here view for “AuthorizedProfile” action).
               @{
                   ViewBag.Title = "AuthorizedProfile";
                }
                <h2>Authorized Profile</h2>

                <h5>@ViewBag.Message</h5>
10: We need to add an action method to verify the 2FA token
In this method, we will be verifying the authentication token which is generated through Google Authenticator mobile App and then after the successful authentication, user will be redirected to the Web Application.
      public ActionResult Verify2FA()
      {

         var token = Request["passcode"];

         TwoFactorAuthenticator tfa = new TwoFactorAuthenticator();

          string UserUniqueKey = Session["UserUniqueKey"].toString();

           bool isValid = tfa.ValidateTwoFactorPIN(UserUniqueKey, token);

           if (isValid)
           {
               Session["IsValidAuthentication"] = true;
               return RedirectToAction("MyProfile", "Home");
            }
               return RedirectToAction("Login", "Home");
            }
11: We need to configure the Login page as the default startup page.
For doing this, we need to go to the App_Start and open the RouteConfig.cs file and edit it. In this file, we need to edit the MapRoute and set the “Login” action method instead of “Index” action method as the default action method.
12: We need to Run the Application.
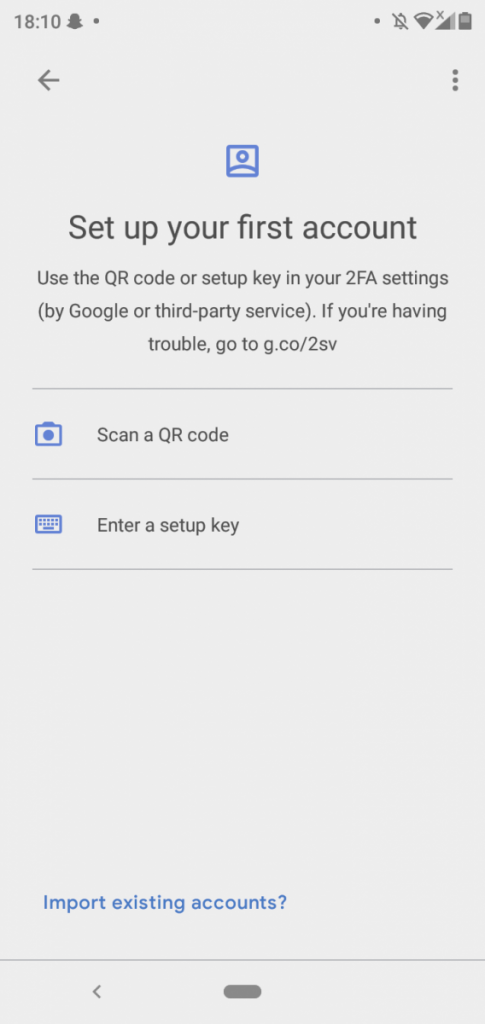
After providing the valid username and password, the user will be asked to enter the 6 digit Google Authenticator Code. Then the user needs to open the Google Authenticator mobile App installed in the mobile phone and need to set up the account. There will be two options as shown in the below image. The user needs to either Scan the QR Code from the webpage or manually enter the setup key. Then the user will get 6 digit code on the mobile application. After that, the user needs to enter that 6 digit code to the login page of the web application and verify. Now, the user will be successfully authenticated and will be redirected to the web application services.
