How to create and execute test cases using Zephyr in JIRA?
How to create and execute test cases using Zephyr in JIRA?
14 October 2020
Zephyr for JIRA brings quality test management capabilities to any JIRA project. When Zephyr is used with JIRA, the test cases can be created inside Jira, and executed whenever required, or as part of a test cycle. Detailed test metrics can also be viewed and tracked.
How to install Zephyr for JIRA?
- As a JIRA Administrator, navigate to the Administration page and click on the “Add-ons” button in the top menu bar.
- Now choose the “Find new add-ons” menu item and enter “Zephyr for JIRA” in the search field on the left.
- In the resulting search, choose “Zephyr for JIRA – Test Management inside JIRA” and click on the “Buy Now” or “Free Trial” buttons. Clicking on one of them will take you to https://my.atlassian.com where you can either enter your user id/password or create a new account. You will get a free 30-day evaluation version or let you buy licenses for Zephyr for JIRA.
- Now the software will be installed and the License key will be automatically added to activate it.
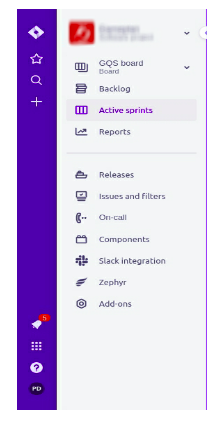
Once the Zephyr is installed in the JIRA it will be displayed in the side menu bar.
How to create a test?
To create a test case follow the following steps:
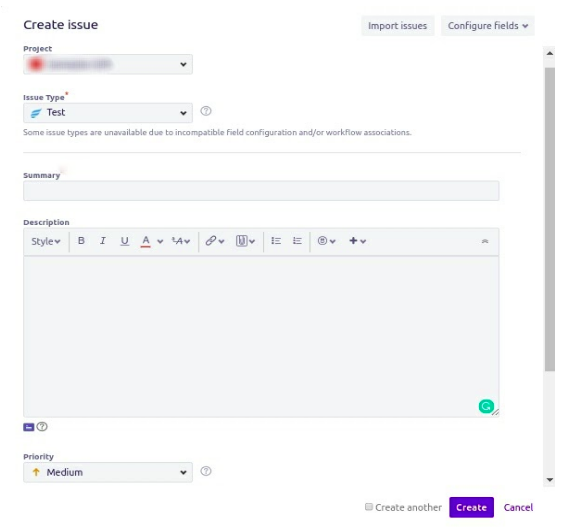
- Click on the “+” (Create) icon displaying on the left side of the page. A create issue page or pop-up will be displayed to the user.
- Select the desired project by clicking on the ‘Project’ drop-down field.
- Select ‘Test’ as the issue type from the ‘Issue Type’ drop-down list.
- Enter the required details and other required additional information in the respective fields as per our project requirements.
- The fields while creating a test can be modified/customized by clicking on the ‘Configure Fields’ tab.
- Click the ‘Create’ button.
- This will create a new test, which is an issue of type ‘Test’.
- To add test steps and their details, the test issue needs to be modified.

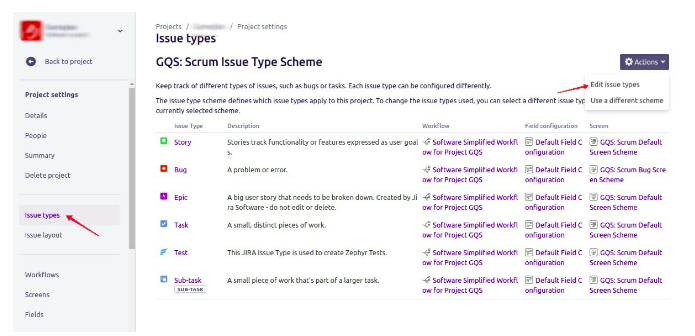
Most of the time the Issue Type ‘Test’ is not displayed to the user in the drop-down list on clicking the drop-down box. As we need to add this issue type manually. So to add the ‘Test’ as the issue type one need to log in from the administrative credentials and has to follow the following steps:
- Select the project for which we need to add the ‘Test’ issue type.
- Click on the ‘Project Settings’ tab.
- Then click on the ‘Issues Type’ tab.
- Click on the ‘Actions’ field displayed on the right-hand side of the page.
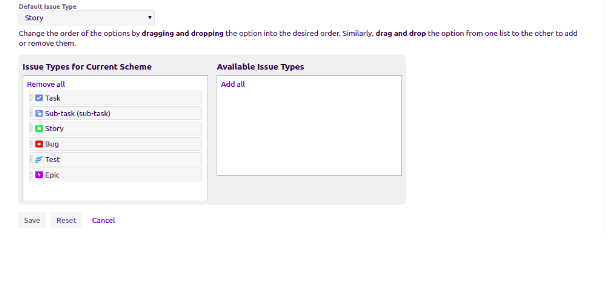
- Click on the ‘Edit issue types’ option as displayed in the below image.

- Drag and drop the ‘Test’ issue type in the Issue Types for Current Scheme section.

Add Test Steps
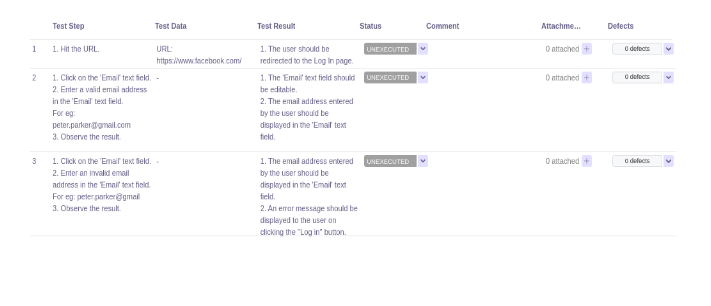
- Open the test to edit and add the test steps and test details.
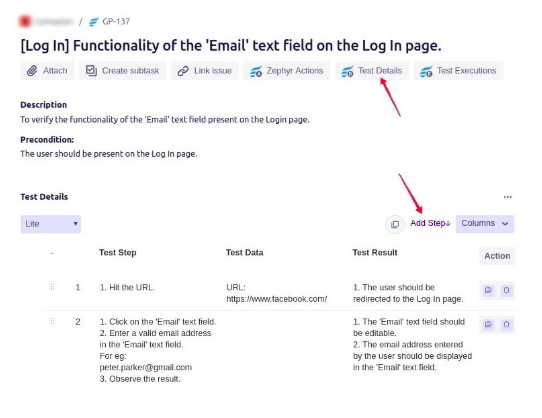
- Click on the ‘Test Details’ icon displaying below the test summary.
- Go to the ‘Test Details’ section and start adding details in ‘Test Step’, ‘Test Data’ and ‘Expected Result’ columns.
- After adding the required details click on ‘Add Steps’ (button with icon available under the ‘Actions’ column) button.
- Continue adding more steps, as required.

Create Test Cycles
After writing the test cases we need to execute those test cases. For executing the test cases firstly we need to create the test cycles. Follow the following steps to create a new test cycle:
- Click on the ‘Cycle Summary’ tab.
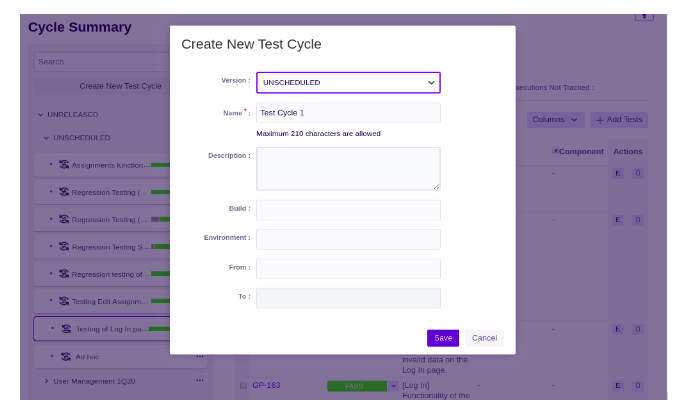
- Click on the ‘Create New Test Cycle’ button.
- This will display the ‘Create New Cycle’ module which allows you to complete the fields for the corresponding test cycles.
- Afterward, click on the ‘Save‘ button at the bottom of the interface to create the test cycle.
- After creating your testing cycle, you can view the test cycle in the folder structure on the left-hand side of the interface.

Add Tests to the Test Cycle
- Select the test cycle to which you want to add the tests.
- Click on the ‘Add Tests’ button.
- Now use the drop-down list to search for all the test cases that need to be added to the cycle. We can also type the ID of the test case to add it to the list of test cases to be added.
- After selecting all the test cases that you want to add to the testing cycle, you must select a person in JIRA who you are assigning the added test cases to.
- Click on the ‘Add‘ button once you’ve finished selecting and assigning all your test cases.
- After adding your test cases, you can view the added test cases by clicking on the testing cycle and viewing them in the table.
Execute Test Cases
Once the test cases are added into the test cycle we need to execute those test cases. To execute the test cases follow the following steps:
- We can execute test cases by using the drop-down list in the ‘Status‘ column of the test execution table within the testing cycle. We can also execute their test cases in further detail by clicking on the ‘E’ button for the individual test that needs to be executed.

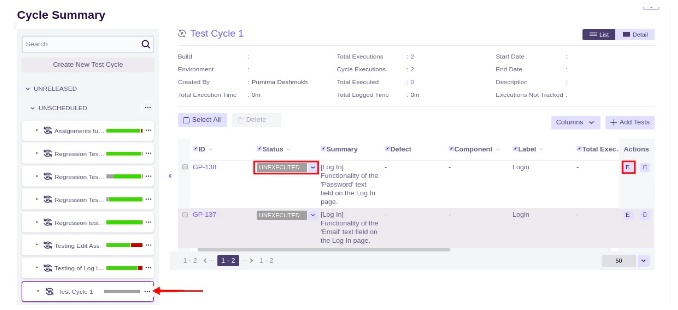
- Then execute the individual step of the test by clicking on the drop-down list in the ‘Status‘ column. Select and update the status of the test step and this will execute the individual test step.

