Build a Mini Netflix with React
Build a Mini Netflix with React
30 June 2021
What is React?
React is a JavaScript library created by Facebook for building fast and interactive user interfaces for efficient user interfaces and single page applications. With React, we can build reusable UI components in our app.
Install create-react-app
Facebook has a command line tool, create-react-app that can scaffold a progressive web app out of the box in less than a minute. If you don’t have it installed, please install and run the command below in your terminal:
npm install -g create-react-app
This will install the create-react-app command line tool, which will make it easy to initialize our app with React.
Setup React
Run the below command via the command line to create a new react project named mininetflix
create-react-app mininetflix
Navigate to the mininetflix directory using the below command
cd mininetflix
Now let’s add a CSS framework i.e bootstrap to style our app. Simply open the project and edit the public/index.html file and put the following snippet inside the <head> section just before the <title>.
<link href="https://maxcdn.bootstrapcdn.com/bootstrap/3.3.7/css/bootstrap.min.css" rel="stylesheet" />
Install Dependencies
Let’s set up the dependencies below using npm, simply run the command npm i <package name> mentioned below.
npm install accepts an array of packages separated by space, which will create installation processes with the sequence of packages. Use the below command to install all the required packages for our project.
npm i auth0-js react-router react-router-dom history jwt-decode axios
- auth0-js: Used for authentication
- react-router, react-router-dom: Used for routing within our app
- history: to manage browser history
- jwt-decode: Used for decoding the JSON Web Token (JWT) in the app
- axios: Used for making HTTP requests from the browser
User Authentication With Auth0
Let’s configure the authentication service needed to authenticate users in our app.
Step 1: Create a Client App
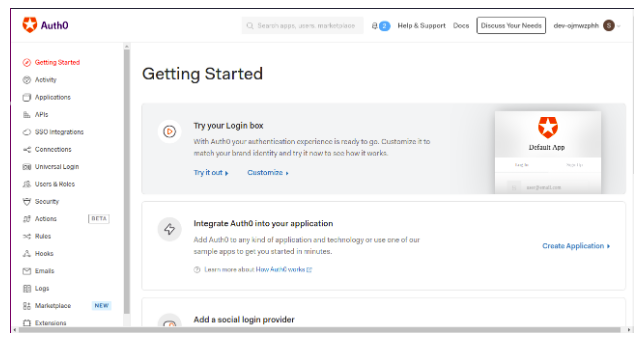
Go to the Auth0 Dashboard (Sign up if you do not have an account already). If you have signed up then click on create application otherwise click on the create a new client button.
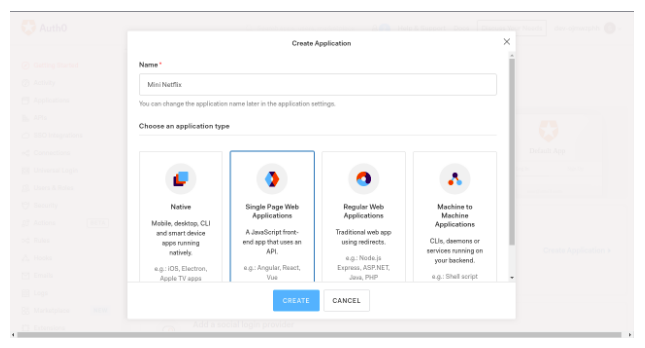
Give your app a name e.g Mini Netflix and select Single Page Web Applications.

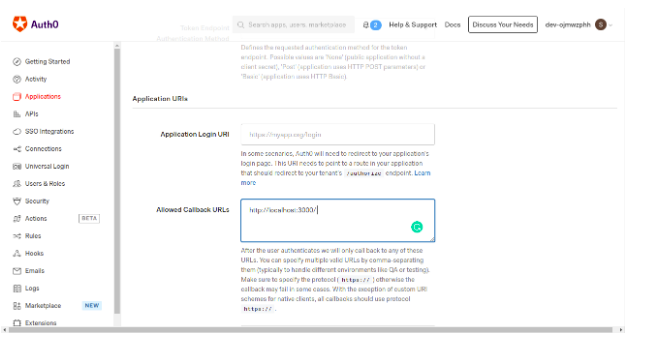
Now select Settings for the created application, Scroll down to the Allowed Callback URLs section and add http://localhost:3000/ and Save Changes

Step 2: Create a New API
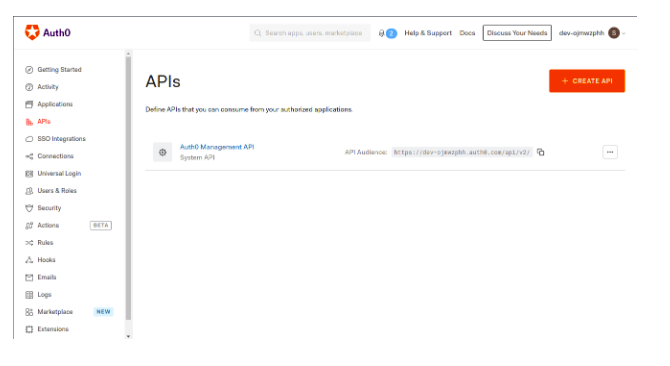
Go to APIs in the Auth0 dashboard and click on the Create API button

Enter a name for the API e.g Minifix API. Set the Identifier to the API endpoint URL. In this example, this is http://localhost:3001/api. Make sure the Signing Algorithm is RS256. Click on the Create button.
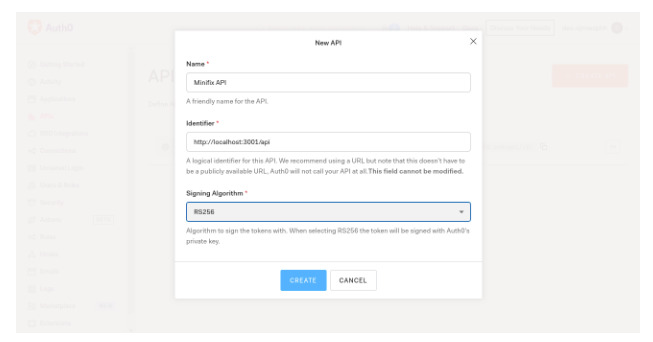

Now we are ready to implement Auth0 authentication in our app.
Step 3: Create an Auth Service
Navigate to the src directory and create a utils folder. In the utils folder, create a file as AuthService.js and add the below code to it.
import decode from 'jwt-decode';

import { createBrowserHistory } from 'history';

import auth0 from 'auth0-js';

const ID_TOKEN_KEY = 'id_token';

const ACCESS_TOKEN_KEY = 'access_token';

const history = createBrowserHistory();

const CLIENT_ID = 'xxxxxxxxxxxxxx';

const CLIENT_DOMAIN = 'xxxxxxxxxx';

const REDIRECT = 'https://localhost:3000/callback';

const SCOPE = 'full:access';

const AUDIENCE = 'http://localhost:3001/api';


var auth = new auth0.WebAuth({

    clientID: CLIENT_ID,

    domain: CLIENT_DOMAIN

});


export function login() {

    auth.authorize({

        responseType: 'token id_token',

        redirectUri: REDIRECT,

        audience: AUDIENCE,

        scope: SCOPE

    });

}


export function logout() {

    clearIdToken();

    clearAccessToken();

    history.push('/');

}


export function requireAuth(nextState, replace) {

    if (!isLoggedIn()) {

        replace({pathname: '/'});

    }

}


export function getIdToken() {

    return localStorage.getItem(ID_TOKEN_KEY);

}


export function getAccessToken() {

    return localStorage.getItem(ACCESS_TOKEN_KEY);

}


function clearIdToken() {

    localStorage.removeItem(ID_TOKEN_KEY);

}


function clearAccessToken() {

    localStorage.removeItem(ACCESS_TOKEN_KEY);

}


// Helper function that will allow us to extract the access_token and id_token

function getParameterByName(name) {

    let match = RegExp('[#&]' + name + '=([^&]*)').exec(window.location.hash);

    return match && decodeURIComponent(match[1].replace(/\+/g, ' '));

}


// Get and store access_token in local storage

export function setAccessToken() {

    let accessToken = getParameterByName('access_token');

    localStorage.setItem(ACCESS_TOKEN_KEY, accessToken);

}


// Get and store id_token in local storage

export function setIdToken() {

    let idToken = getParameterByName('id_token');

    localStorage.setItem(ID_TOKEN_KEY, idToken);

}


export function isLoggedIn() {

    const idToken = getIdToken();

    return !!idToken && !isTokenExpired(idToken);

}


function getTokenExpirationDate(encodedToken) {

    const token = decode(encodedToken);

    if (!token.exp) { return null; }


    const date = new Date(0);

    date.setUTCSeconds(token.exp);


    return date;

}


function isTokenExpired(token) {

    const expirationDate = getTokenExpirationDate(token);

    return expirationDate < new Date();

}
In the above code, we have invoked the auth0 library. Also, we have created methods to store the tokens returned from Auth0, decode them and get the expiry date.
Components Setup
React is all about reusing code, let’s add a new folder named components, in the src directory to get started. We will need the below four components for our app.
- Callback.js
- Dashboard.js: dashboard for viewing all videos
- Nav.js: navigation that all pages in the app will share
- Upload.js: upload videos by registered users
Let’s get started with our components one by one.
Step 1: Callback Component
This component will be used to store the authentication credentials and redirect back to the upload route in our app.
Create a file named Callback.js and add the below code to the file.
import { Component } from 'react';
import { setIdToken, setAccessToken } from '../utils/AuthService';

class Callback extends Component {

componentDidMount() {
setAccessToken();
setIdToken();
window.location.href = "/";
}

render() {
return null;
}
}

export default Callback;
Here we are using the setAccessToken() and setIdToken() method in the componentDidMount() lifecycle hook to ensure that both tokens from the Auth0 server are stored in the browser’s local storage once the Callback component is mounted.
Note: componentDidMount() is a React lifecycle hook which is invoked immediately after the component is mounted.
Step 2: Navigation Component
The Navigation component will be responsible for the navigation section which all of the pages in our app will be sharing.
Create a file named Nav.js and add the below code to the file.
import React, { Component } from 'react';

import { Link } from 'react-router-dom';

import { login, logout, isLoggedIn } from '../utils/AuthService';

import '../App.css';


class Nav extends Component {


    render() {

        return (

            <nav className="navbar navbar-inverse">

                <div className="navbar-header">

                    <Link className="navbar-brand" to="/">Miniflix</Link>

                </div>

                <ul className="nav navbar-nav">

                    <li>

                        <Link to="/">All Videos</Link>

                    </li>

                    <li>

                        {

                            ( isLoggedIn() ) ? <Link to="/upload">Upload Videos</Link> :  ''

                        }

                    </li>

                </ul>

                <ul className="nav navbar-nav navbar-right login-btn">

                    <li>

                        {

                            (isLoggedIn()) ? ( <button className="btn btn-danger log" onClick={() => logout()}>Logout </button> ) : ( <button className="btn btn-default log" onClick={() => login()}>Login</button> )

                        }

                    </li>

                </ul>

            </nav>

        );

    }

}

export default Nav;
In this component, you will observe that a css file has been imported, which is to give the navbar some custom styling. Also, the Bootstrap <nav> element is used to give the app a basic and functional navbar.
The isLoggedIn() function is used from the AuthService. It will basically check the user’s authentication status. If the user is logged in, the Log out button will be displayed, otherwise, the Login button will be displayed to the user.
Step 3: Dashboard Component
This is where we can view all the uploaded videos on our app.
Create a Dashboard.js file in the components folder and add the below code to the file.
import React, { Component } from 'react';
import Nav from './Nav';
import { isLoggedIn } from '../utils/AuthService';

class Dashboard extends Component {

render() {
return (
<div>
<Nav />
<h3 className="text-center"> Dashboard </h3>
<hr/>
<div className="col-sm-12">
</div>
</div>
);
}
}

export default Dashboard;
Step 4: Upload Component
This component will be responsible for handling uploading of videos by the authorized users.
Create a file named Upload.js file in the components folder and add the below code:
import React, { Component } from 'react';
import Nav from './Nav';

class Upload extends Component {

render() {
return (
<div>
<Nav />
<h3 className="text-center">Upload Video</h3>
<hr/>
<div className="col-sm-12">
<div className="jumbotron text-center">
<button className="btn btn-lg btn-info"> Upload </button>
</div>
</div>
</div>
);
}
}
export default Upload;
Add Routes
Now, time to add routes to the app so that we can navigate among our components. Open the src/index.js file and replace the code below to set up the routes.
import React from 'react';
import ReactDOM from 'react-dom';
import { Router, Route } from 'react-router';
import { createBrowserHistory } from 'history';
// component
import Upload from './components/Upload';
import Callback from './components/Callback';
import Dashboard from './components/Dashboard';
// service
import { requireAuth } from './utils/AuthService';

const history = createBrowserHistory();

const Root = () => {
return (
<div>
<Router history={history}>
<Route path="/" component={Dashboard}/>
<Route path="/upload" component={Upload} onEnter={requireAuth} />
<Route path="/callback" component={Callback} />
</Router>
</div>
)
}

ReactDOM.render(<Root/>, document.getElementById('root'));
Now, run the application by running npm start command in the terminal, you should see something like this:


Upload Videos
We need a storage space for the videos that users will upload.
Cloudinary provides cloud storage and an awesome upload widget that allows users to upload videos or any type of file from their local computer, Facebook, Dropbox, Google Drive and Instagram.
Integrate Cloudinary Upload Widget:
Open up the public/index.html file and include Cloudinary’s widget script just below the stylesheet links.
<script src="https://widget.cloudinary.com/v2.0/global/all.js" type="text/javascript">
</script>
Update Upload Component:
Head over to src/components/Upload.js and modify the code to have an uploadWidget function.
import React, { Component } from 'react';
import Nav from './Nav';

class Upload extends Component {


showWidget = () => {

let widget = window.cloudinary.createUploadWidget({
cloudName: `sample`,
uploadPreset: `uploadPreset`},
(error, result) => {
if (!error && result && result.event === "success") {
console.log(result.info.url);
}});
widget.open()
}

uploadWidget = () => {
window.cloudinary.openUploadWidget(
{ cloud_name: 'cloud_name',
upload_preset: '<unsigned-preset>',
tags: ['miniflix'],
sources: ['local', 'url', 'facebook', 'image_search']
},
function(error, result) {
console.log("This is the result of the last upload", result);
});
}

render() {
return (
<div>
<Nav />
<h3 className="text-center">Upload Video</h3>
<hr/>

<div className="col-sm-12">
<div className="jumbotron text-center">
<button className="btn btn-lg btn-info" onClick={this.showWidget}> Upload Video</button>
</div>
</div>
</div>
);
}
}

export default Upload;
In the above code, we have added a third argument i.e tags. Cloudinary provides this for automatic video tagging. Every video uploaded to this app will be automatically tagged as miniflix. Furthermore, we can provide as many tags as we want. This feature is very useful when we want to search for videos too.
In the uploadWidget function, we called the cloudinary.openUploadWidget function and attached it to the “Upload Video” button. When the user clicks the button, it will open the widget.
Now let’s Head over to the /upload route and try uploading a video.


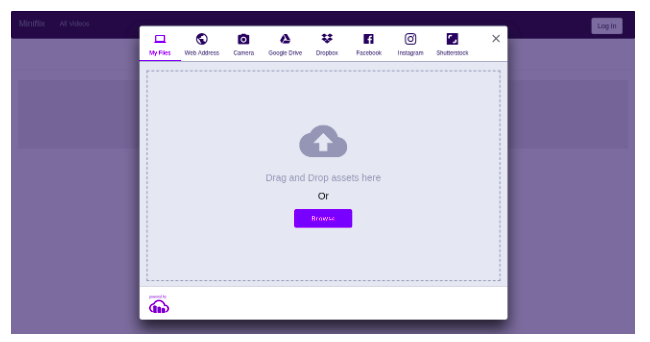

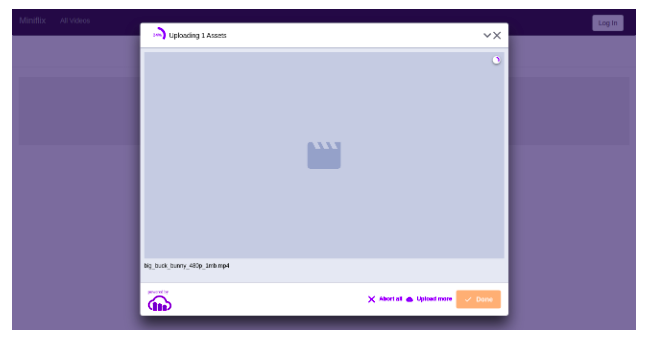

It uploads the video straight to Cloudinary and returns a response object about the recently uploaded video that contains so many parameters such as the unique publicid, secureurl, url, originalfilename, thumbnailurl, createdate, duration and so many others.
Display Videos
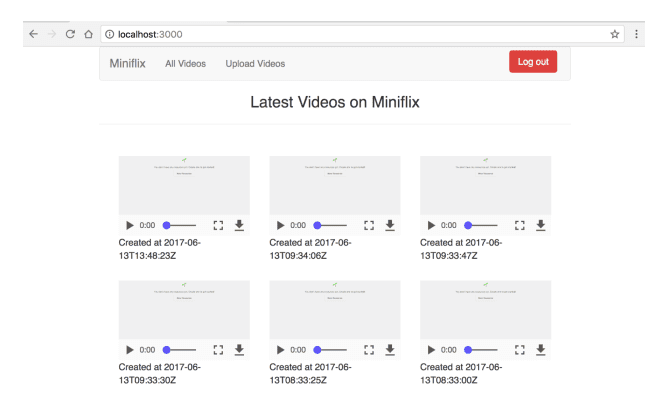
We need a dashboard to display all our uploaded videos for users to see at a glance.
Step 1: Install the cloudinary-react
Let’s Install the cloudinary-react package via the command line
npm install cloudinary-react
Step 2: Modify dashboard component
Open up components/Dashboard.js and modify the code to be this below:
import Nav from './Nav';
import axios from 'axios';
import React, { Component } from 'react';
import { CloudinaryContext, Video } from 'cloudinary-react';

class Dashboard extends Component {

state = { videos: [] };

getVideos() {
axios.get('http://res.cloudinary.com/<cloud-name>/video/list/miniflix.json')
.then(res => {
this.setState({ videos: res.data.resources});
});
}

componentDidMount() {
this.getVideos();
}

render() {

const { videos } = this.state;

return (
<div>
<Nav />
<h3 className="text-center"> Latest Videos on Miniflix </h3>
<hr/>

<div className="col-sm-12">
<CloudinaryContext cloudName="<cloud-name>">
{ videos.map((data, index) => (
<div className="col-sm-4" key={index}>
<div className="embed-responsive embed-responsive-4by3">
<Video publicId={data.public_id} width="300" height="300" controls></Video>
</div>
<div> Created at {data.created_at} </div>

</div>
))
}
</CloudinaryContext>
</div>
</div>
);
}
}

export default Dashboard;
So if we had a tag like vimeo, our url will end up with …/vimeo.json. So in the code below, we got all the videos and stored in the videos state like so:
axios.get('http://res.cloudinary.com/<cloud-name>/video/list/miniflix.json')
.then(res => {
console.log(res.data.resources);
this.setState({ videos: res.data.resources});
});

Enable Auth
The last thing we want is to restrict the uploading of videos to registered users only.
The first step is to add the callback route to the list of routes. The second step is to restrict the upload route to registered users.
Add Callback route:
Modify the routes in src/index.js to be like this:
import React from 'react';
import ReactDOM from 'react-dom';
import Upload from './components/Upload';
import Display from './components/Display';
import Callback from './components/Callback';
import registerServiceWorker from './registerServiceWorker';
import { Router, Route, browserHistory } from 'react-router';
import { requireAuth } from './utils/AuthService';

const Root = () => {
return (
<div className="container">
<Router history={browserHistory}>
<Route path="/" component={Display}/>
<Route path="/upload" component={Upload} />
<Route path="/callback" component={Callback} />
</Router>
</div>
)
}

ReactDOM.render(<Root />, document.getElementById('root'));
registerServiceWorker();
Restrict Upload route
Modify the routes in src/index.js to be like this:
import React from 'react';
import ReactDOM from 'react-dom';
import Upload from './components/Upload';
import Display from './components/Display';
import Callback from './components/Callback';
import registerServiceWorker from './registerServiceWorker';
import { Router, Route, browserHistory } from 'react-router';
import { requireAuth } from './utils/AuthService';

const Root = () => {
return (
<div className="container">
<Router history={browserHistory}>
<Route path="/" component={Display}/>
<Route path="/upload" component={Upload} onEnter={requireAuth} />
<Route path="/callback" component={Callback} />
</Router>
</div>
)
}

ReactDOM.render(<Root />, document.getElementById('root'));
registerServiceWorker();
Now, users won’t be able to upload videos until they are registered on your app.


